ChainLaunch

How to Create a Hyperledger Fabric Network

How to Create a Hyperledger Fabric Network

David Viejo

Written by David Viejo

Setting up a Hyperledger Fabric network traditionally requires deep knowledge of cryptographic materials, channel configurations, and complex YAML files. According to the Hyperledger Foundation's 2025 Annual Report, Fabric remains the most widely deployed enterprise blockchain framework, yet teams still spend days on initial network configuration. This guide walks you through deploying a fully configured Fabric network — organizations, peers, orderers, and channels — in under ten minutes.

TL;DR: You can deploy a production-ready Hyperledger Fabric network with organizations, peer nodes, orderer nodes, and an etcdraft channel in under 10 minutes. Fabric powers over 35% of enterprise blockchain deployments (Hyperledger Foundation, 2025), and this tutorial covers every step with screenshots.

For a full breakdown of what enterprise blockchain infrastructure costs, see our Hyperledger development cost guide.

What Will You Deploy?

By the end of this guide, you'll have:

  • A complete Fabric network with the "mychannel" channel
  • 1 organization (Org1MSP) with all necessary certificates
  • 1 peer node for transaction endorsement
  • 3 orderer nodes using etcdraft consensus for high availability
  • Production-ready configuration with proper policies and capabilities

Want to compare deployment approaches? See our Kaleido vs ChainLaunch vs Kubernetes comparison.

What Are the Prerequisites?

Before starting, ensure you have:

  • Operating System: macOS or Linux (Windows is not supported)
  • Network Access: Internet connection to download ChainLaunch
  • System Requirements: At least 4GB RAM, 10GB free disk space

Install ChainLaunch Pro

To install ChainLaunch Pro with advanced features:

export GITHUB_TOKEN="<your_github_token>"
curl -fsSL https://chainlaunch.dev/install-pro.sh | bash

Or install the free version:

curl -fsSL https://chainlaunch.dev/install.sh | bash

Start the Server

Once installed, start ChainLaunch with:

export CHAINLAUNCH_USER=admin
export CHAINLAUNCH_PASSWORD=admin123
chainlaunch serve --data=./chainlaunch-data --db=./chainlaunch.db --port=3100

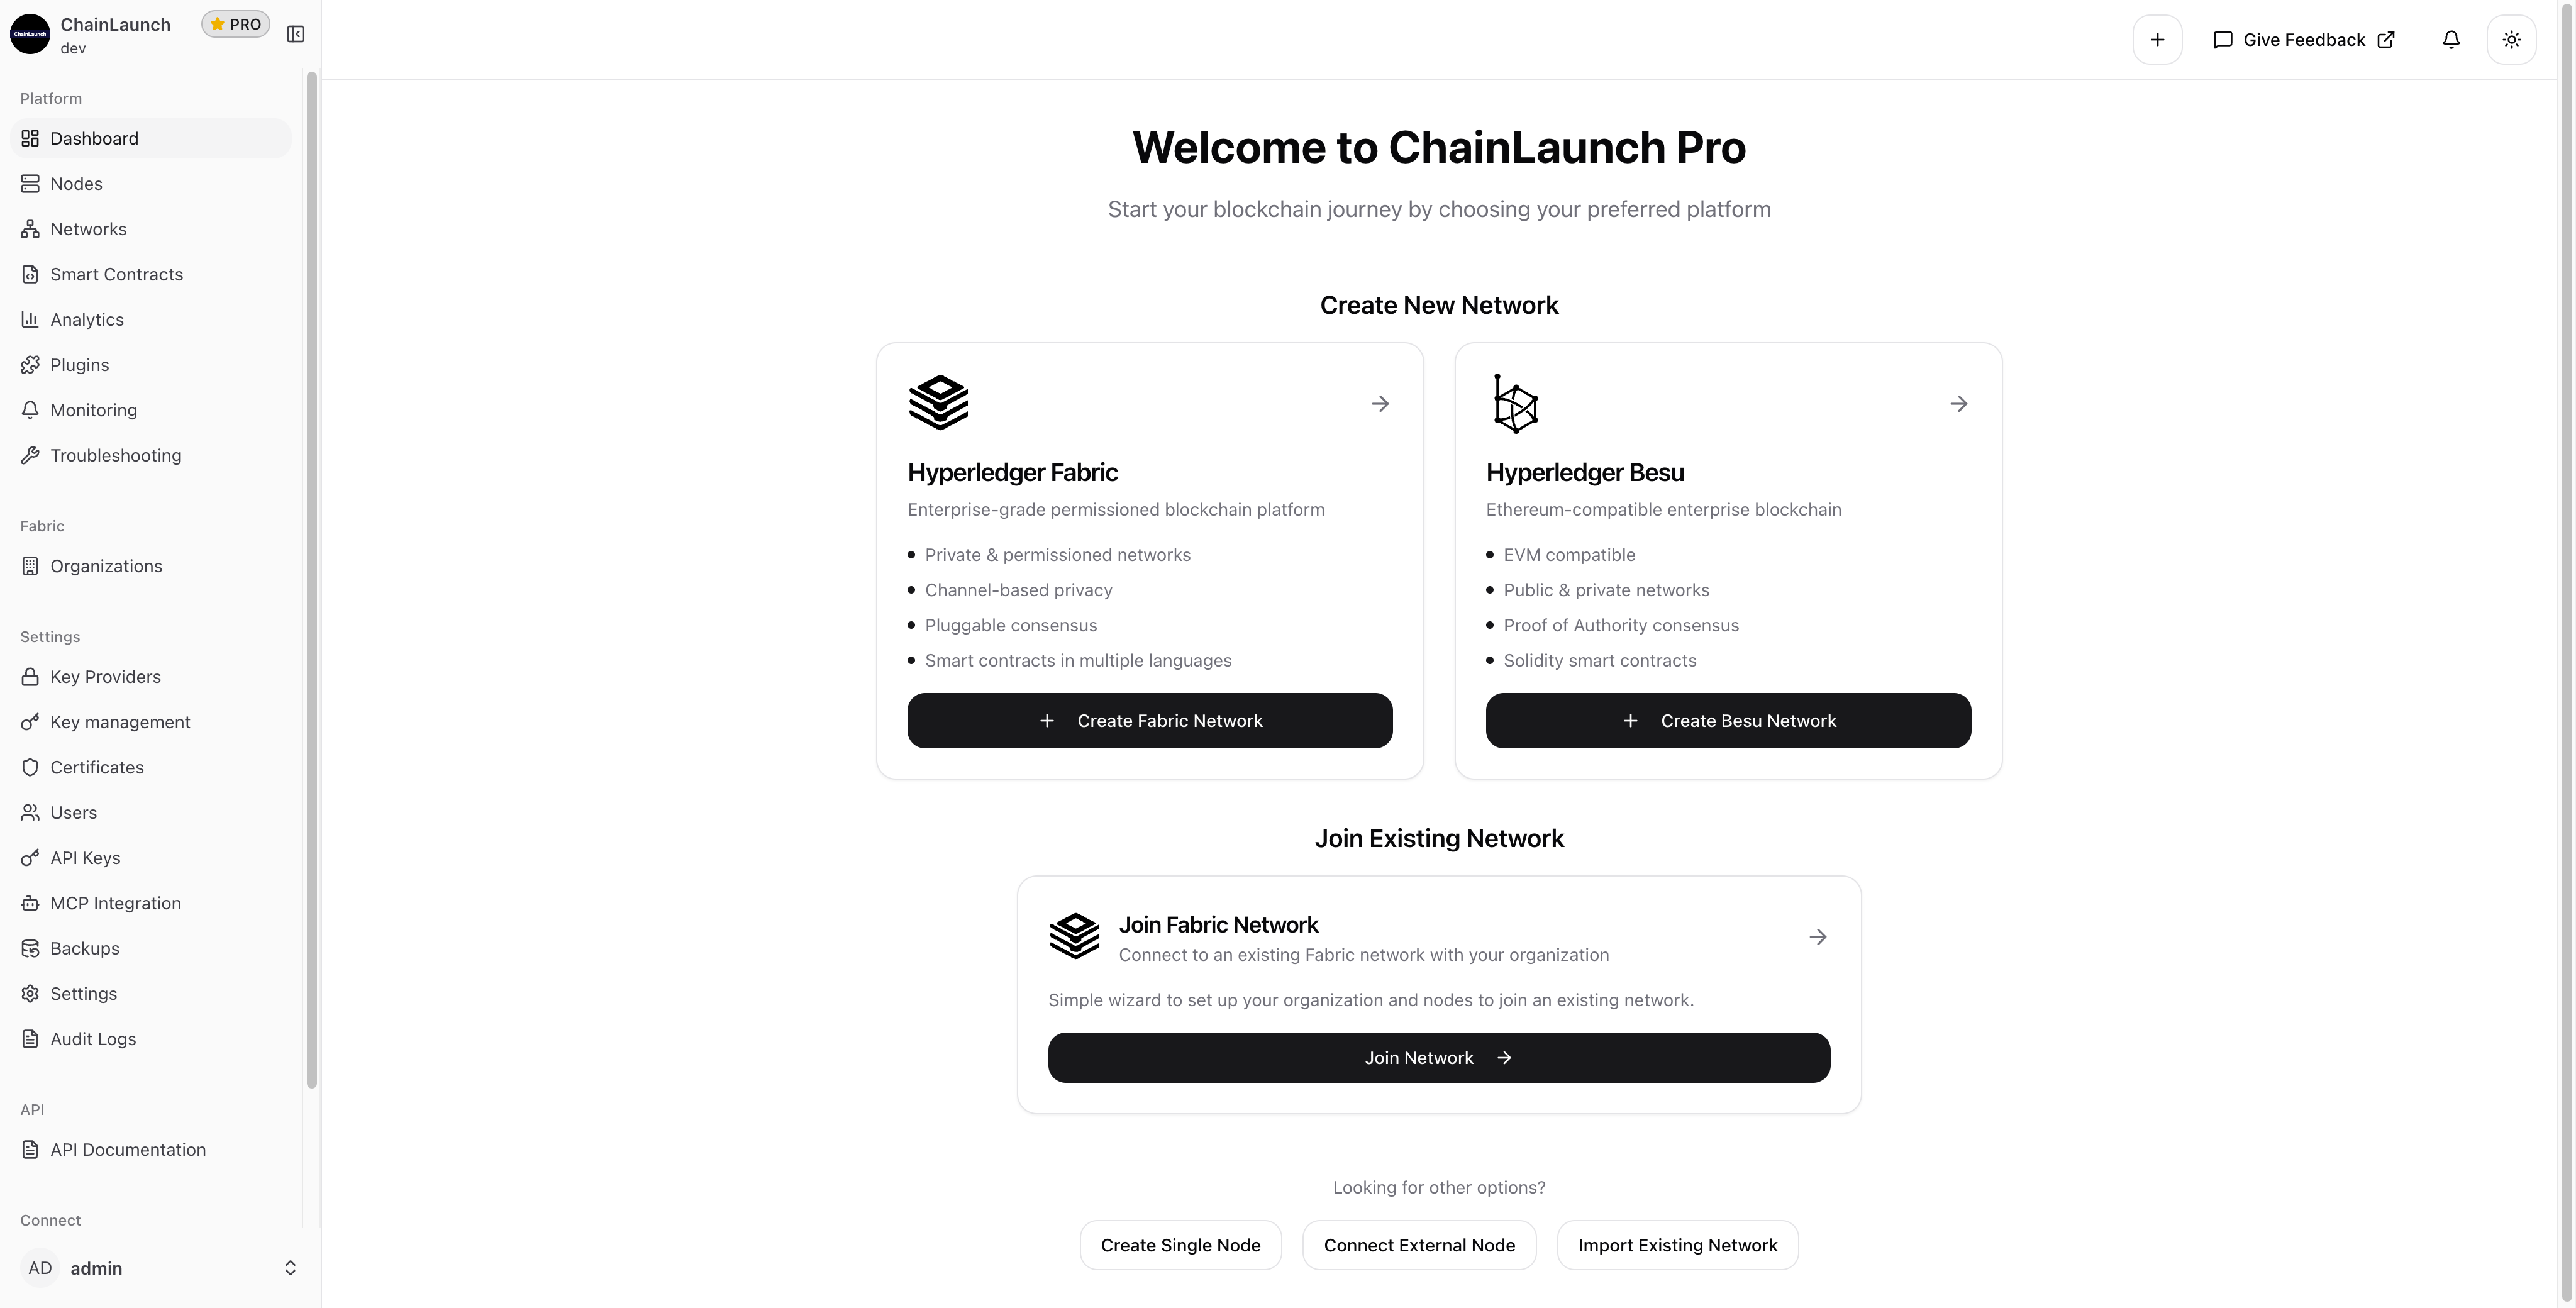
This will start the dashboard at http://localhost:3100.

Step 1: Access the Dashboard

Navigate to your ChainLaunch instance. The dashboard displays options to create Fabric or Besu networks.

ChainLaunch Dashboard

Click on the Hyperledger Fabric card or the "Create Fabric Network" button to start the network creation wizard.

Step 2: Start the Fabric Network Setup Wizard

The wizard guides you through 5 steps:

  1. Create Organizations
  2. Configure Nodes
  3. Create Nodes
  4. Create Network
  5. Complete

Fabric Wizard Step 1

In Step 1, you need to add at least one organization. Click "Create New Organization" to add your first organization.

Step 3: Create Your Organization

A dialog appears to configure your organization:

Create Organization Dialog

Fill in the organization details:

  • MSP ID: Org1MSP - The unique identifier for your organization
  • Description: A brief description of your organization
  • Key Provider: Use the default database provider for development
  • Certificate Validity: Default settings are suitable for most use cases

Organization Form Filled

Click "Create Organization" to generate all the necessary cryptographic materials including:

  • Root CA certificate
  • Admin certificates
  • TLS certificates

Step 4: Organization Created

Your organization is now created and ready to use.

Organization Created

The organization card shows:

  • MSP ID: Org1MSP
  • Status: Existing (indicates certificates are generated)
  • Description: Your organization description

Click "Next" to proceed to node configuration.

Step 5: Configure Nodes

In Step 2, configure the number of peer and orderer nodes for each organization.

Node Configuration

Key configuration options:

  • Consensus Type: etcdraft (requires minimum 3 orderers) or BFT (requires minimum 4 orderers)
  • Orderer Nodes: Number of ordering nodes per organization (default: 3 for fault tolerance)
  • Peer Nodes: Number of peers per organization (default: 1)

The summary shows:

  • Total orderers: 3
  • Total peers: 1
  • Total nodes to create: 4

Click "Next" to review the nodes.

Step 6: Review & Create Nodes

Step 3 displays all nodes that will be created:

Review Nodes

The wizard will create:

  • peer0-org1msp: Peer node for Org1MSP
  • orderer0-org1msp: First orderer node
  • orderer1-org1msp: Second orderer node
  • orderer2-org1msp: Third orderer node

Click "Next" to create the nodes and proceed to network configuration.

Step 7: Configure the Network Channel

Step 4 is where you configure the channel and network settings.

Channel Information

Channel Configuration

  • Channel Name: mychannel - The name of your Fabric channel
  • Description: Optional description for the channel
  • Local Organizations: Select which organizations participate in the channel

The Consenters section shows all orderer nodes that will participate in consensus.

Capabilities Configuration

Capabilities Configuration

Configure channel capabilities:

  • Channel Capabilities: V2_0, V3_0
  • Application Capabilities: V2_0, V2_5
  • Orderer Capabilities: V2_0

Consensus & Batch Configuration

Consensus Configuration

Configure consensus and batch processing:

Batch Configuration:

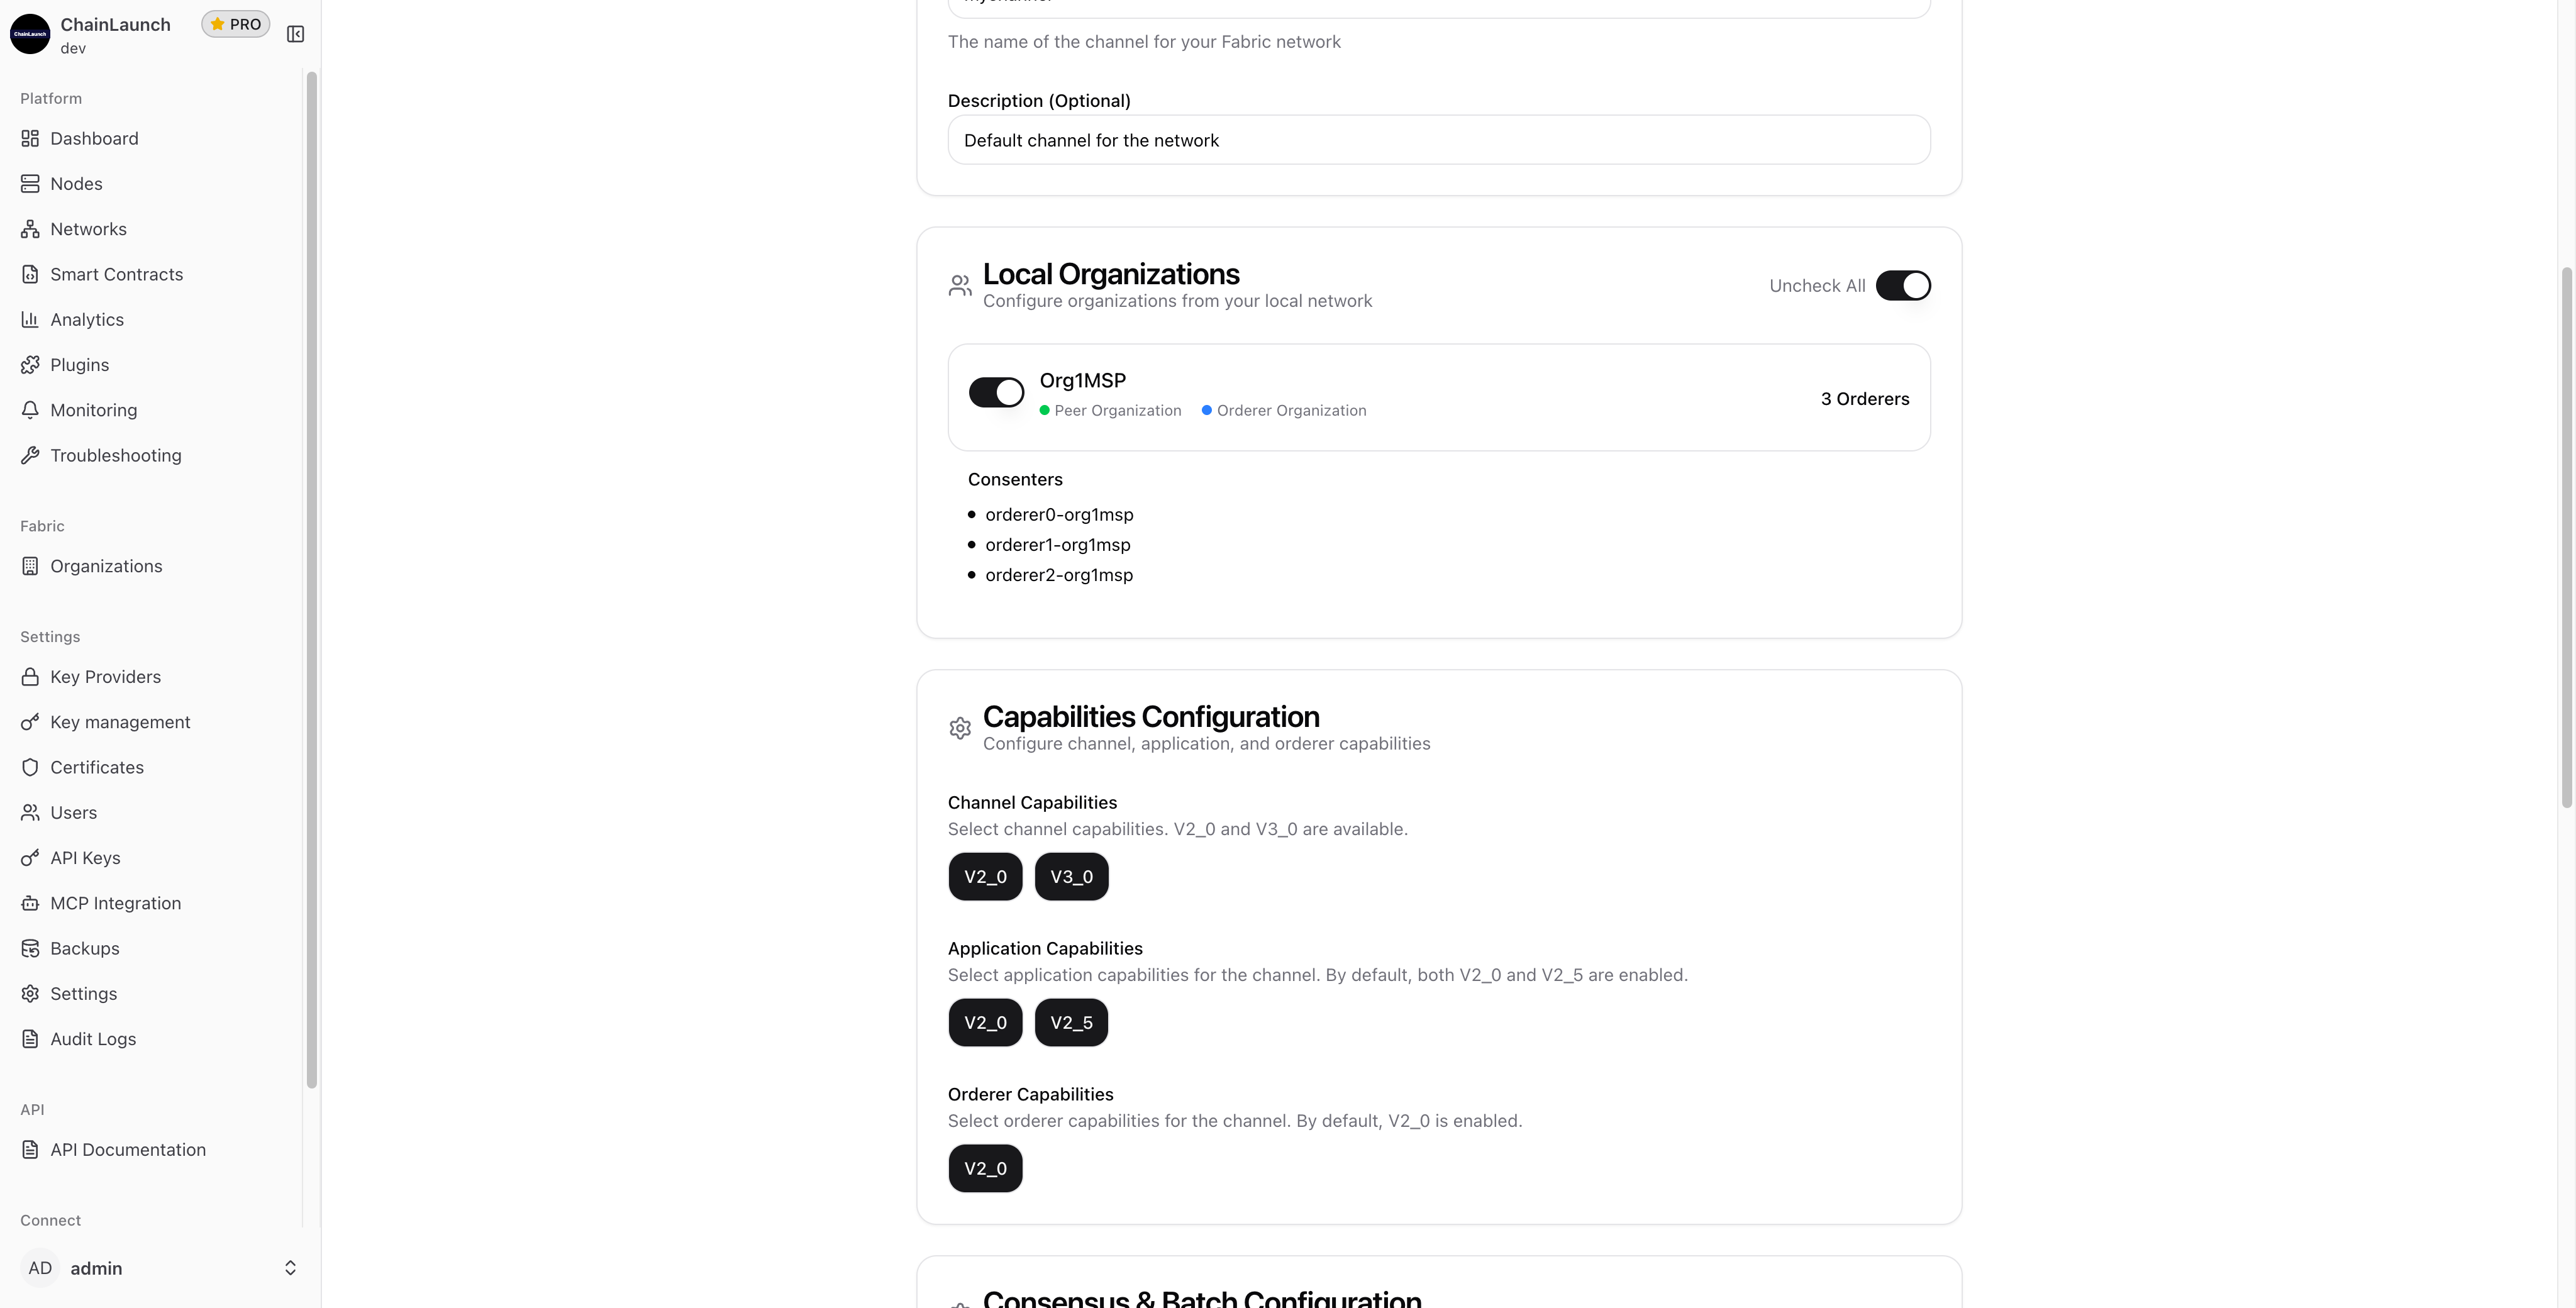
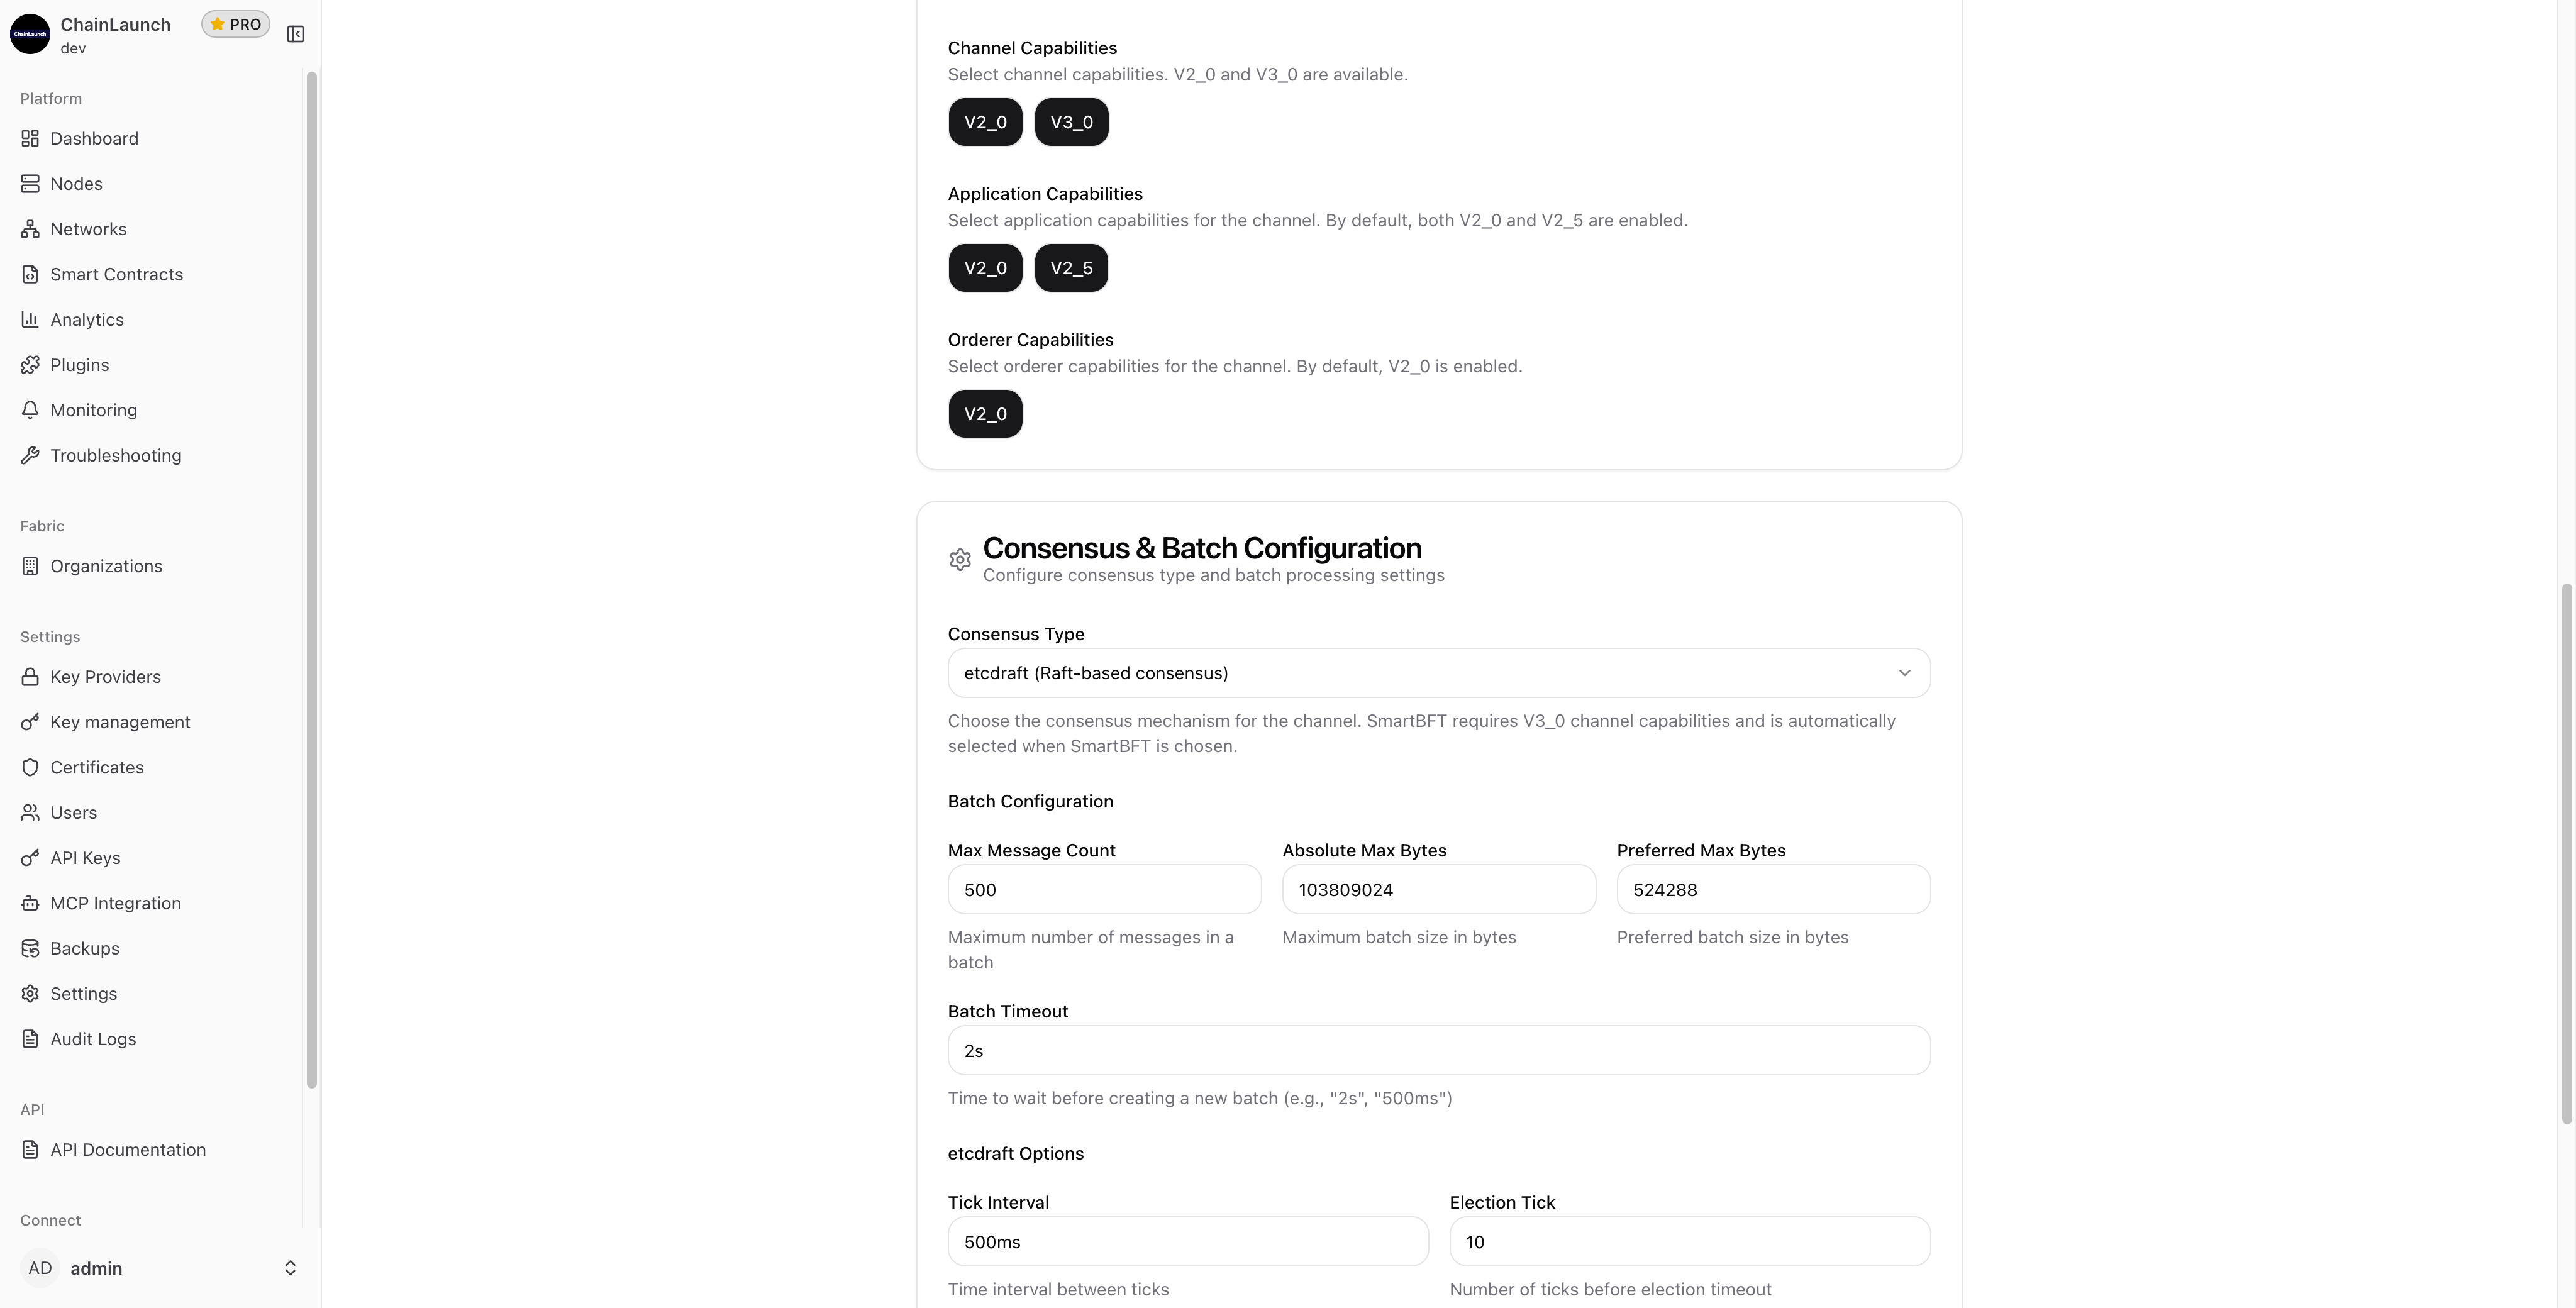
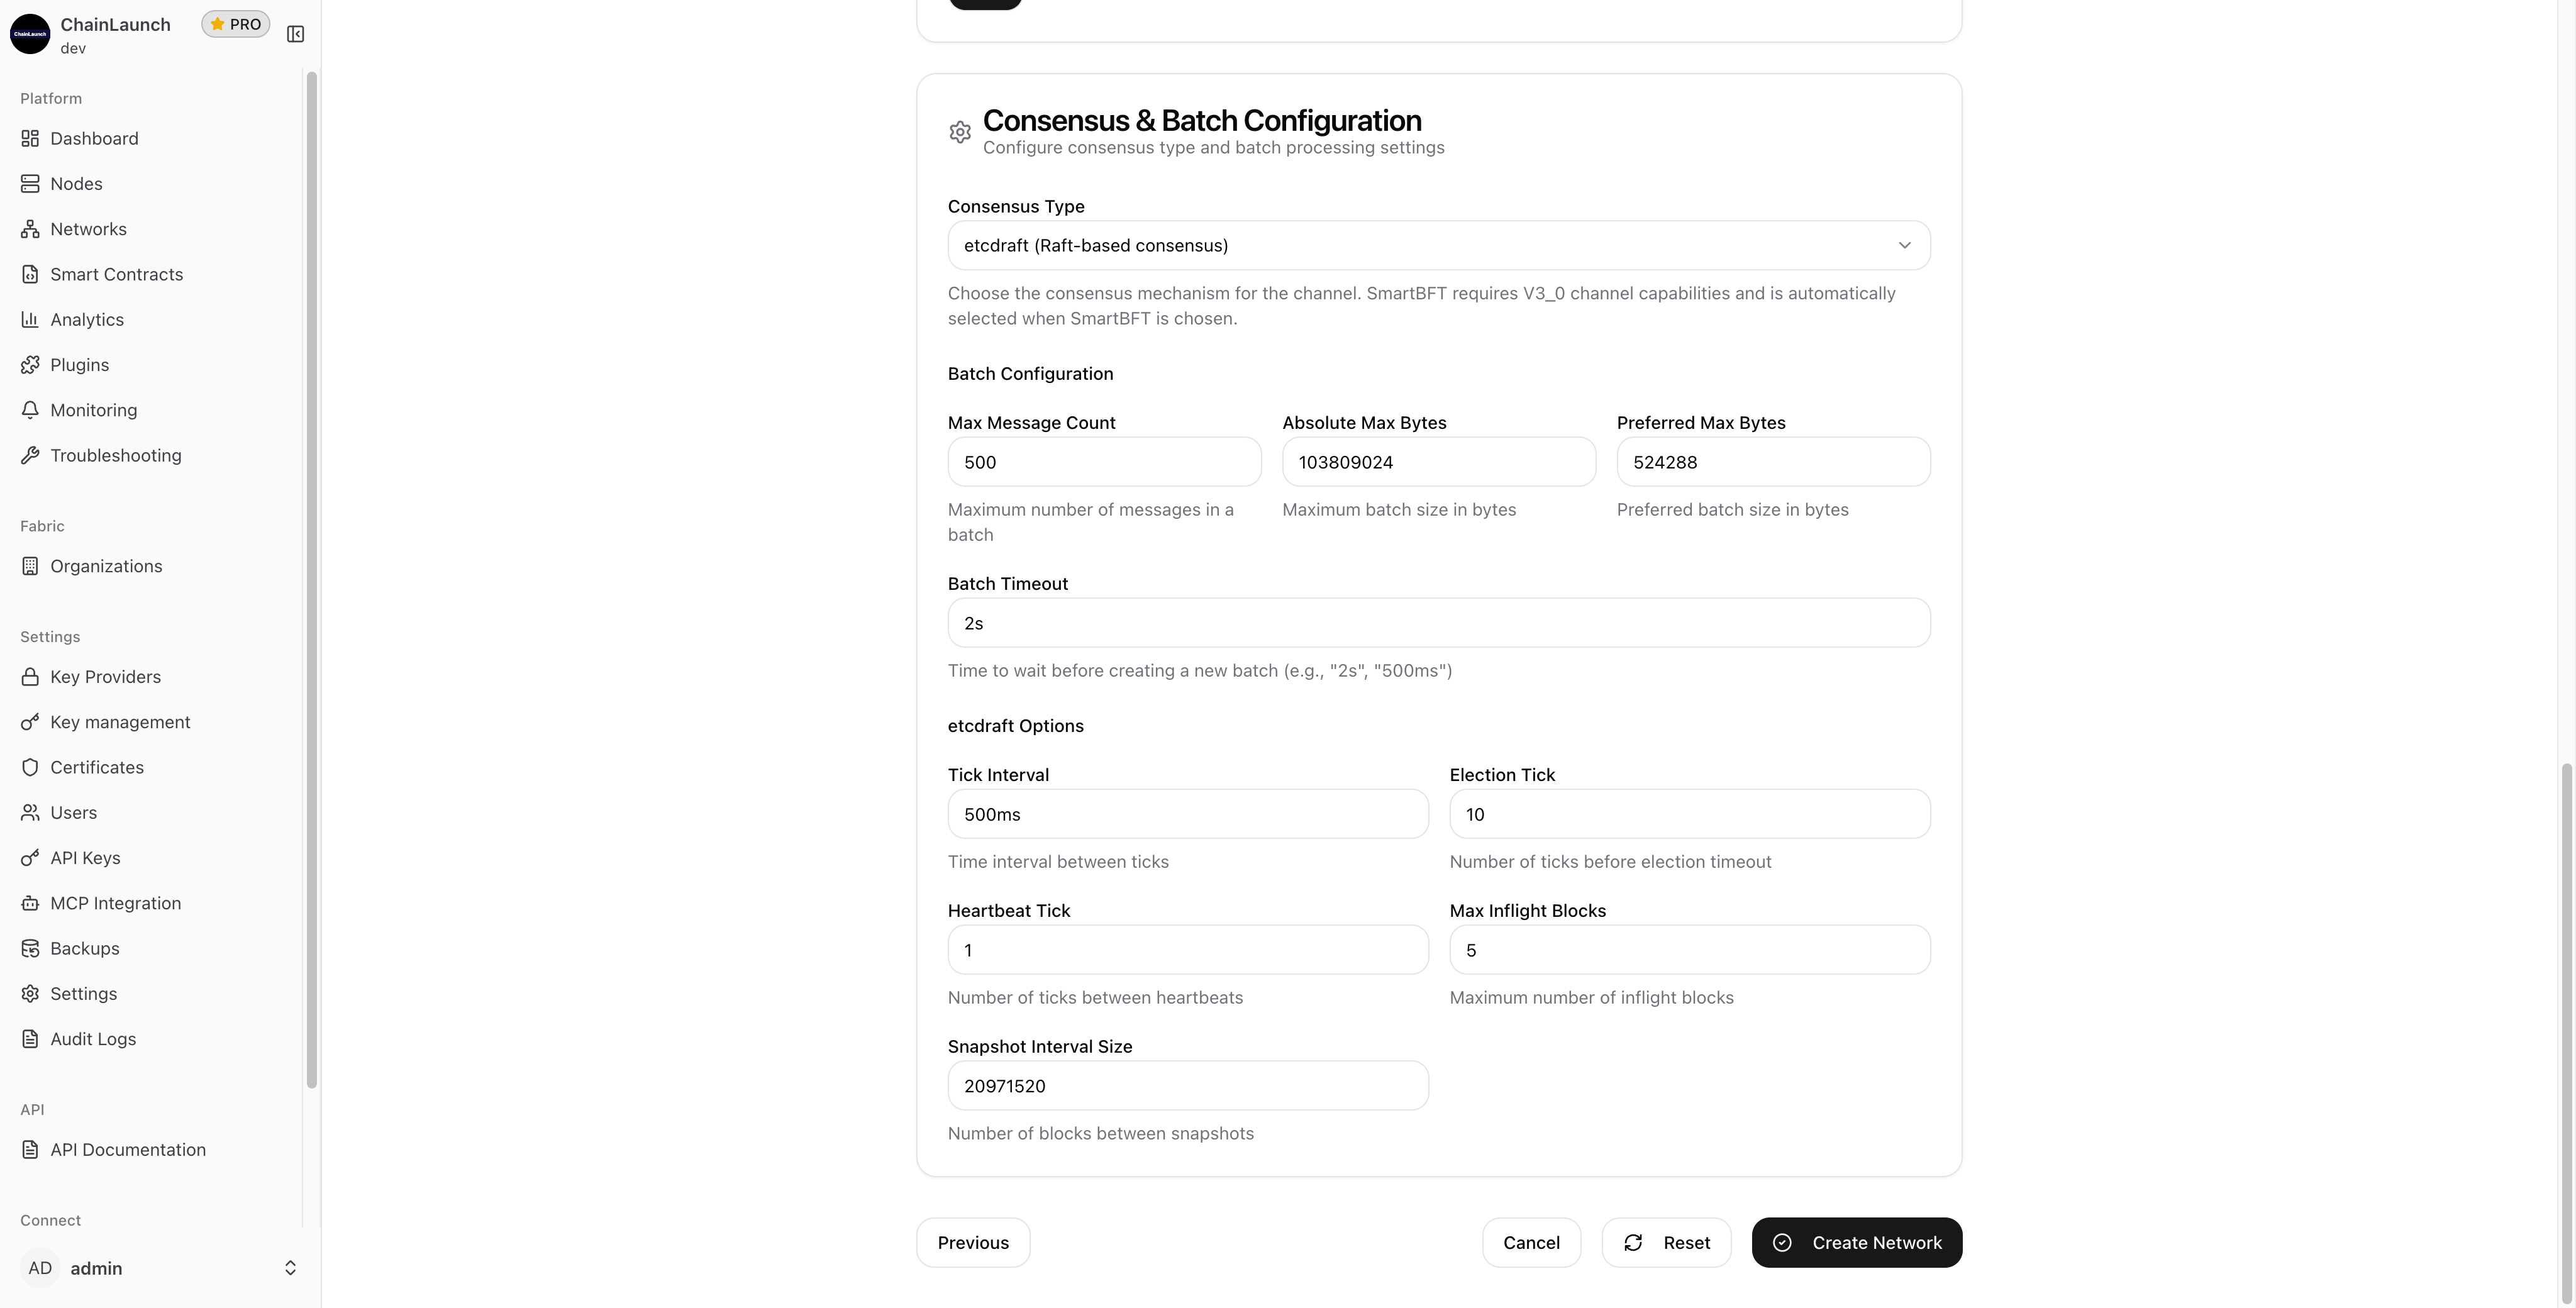
  • Max Message Count: 500 - Maximum transactions per block
  • Absolute Max Bytes: 103809024 - Maximum block size
  • Preferred Max Bytes: 524288 - Preferred block size
  • Batch Timeout: 2s - Time before creating a new block

etcdraft Options:

  • Tick Interval: 500ms - Time between Raft ticks
  • Election Tick: 10 - Ticks before leader election timeout
  • Heartbeat Tick: 1 - Ticks between heartbeats
  • Max Inflight Blocks: 5 - Maximum blocks in flight

Step 8: Create the Network

Scroll down and click "Create Network" to deploy your Fabric network.

Create Network Button

ChainLaunch will:

  1. Generate the genesis block
  2. Start all orderer nodes
  3. Start all peer nodes
  4. Create the channel
  5. Join peers to the channel

Step 9: Network Created Successfully

Once complete, you'll see the success screen:

Network Created

Your network is ready with:

  • Channel: mychannel
  • Created Organizations: Org1MSP
  • Created Nodes: peer0-org1msp, orderer0-org1msp, orderer1-org1msp, orderer2-org1msp

Click "View Network Details" to explore your network.

Step 10: Explore Your Network

The network details page provides comprehensive information about your Fabric network:

Network Details

Key information displayed:

  • Network Status: genesis_block_created
  • Consensus: etcdraft
  • All nodes: Running status

Available tabs for network management:

  • Details: Network overview and node status
  • Anchor Peers: Configure anchor peers for cross-organization communication
  • Consenters: Manage ordering service consenters
  • Chaincode: Deploy and manage smart contracts
  • Channel Update: Modify channel configuration
  • Explorer: Browse blocks and transactions
  • Revocation: Manage certificate revocations
  • Proposals: Handle channel update proposals
  • Metrics: Monitor network performance
  • Network Map: Visualize network topology

What Should You Do Next?

Now that your Fabric network is running, here's what to tackle next.

Most teams move straight to chaincode deployment after standing up their first network. That's the right instinct — a running network without smart contracts isn't doing useful work yet.

Deploy Chaincode

Navigate to the Chaincode tab to deploy your first smart contract:

  1. Package your chaincode
  2. Install on peers
  3. Approve for your organization
  4. Commit the chaincode definition

You can also use AI to generate and deploy chaincodes directly from natural language descriptions.

Configure Anchor Peers

Set up anchor peers for cross-organization discovery by clicking "Configure Anchor Peers" in the alert banner.

Add More Organizations

Use the wizard to add additional organizations and expand your consortium.

Monitor Your Network

Navigate to the Metrics tab to view:

  • Block production rate
  • Transaction throughput
  • Node health status

If you also need an Ethereum-compatible network, see how to deploy a Besu network in 2 minutes.

Frequently Asked Questions

How long does it take to create a Hyperledger Fabric network?

With a guided wizard, the entire process takes under 10 minutes — from installing the platform to having a running network with peers, orderers, and a configured channel. Manual setup using Fabric's native tools typically takes 1-3 days for teams new to the framework.

How many orderer nodes do I need?

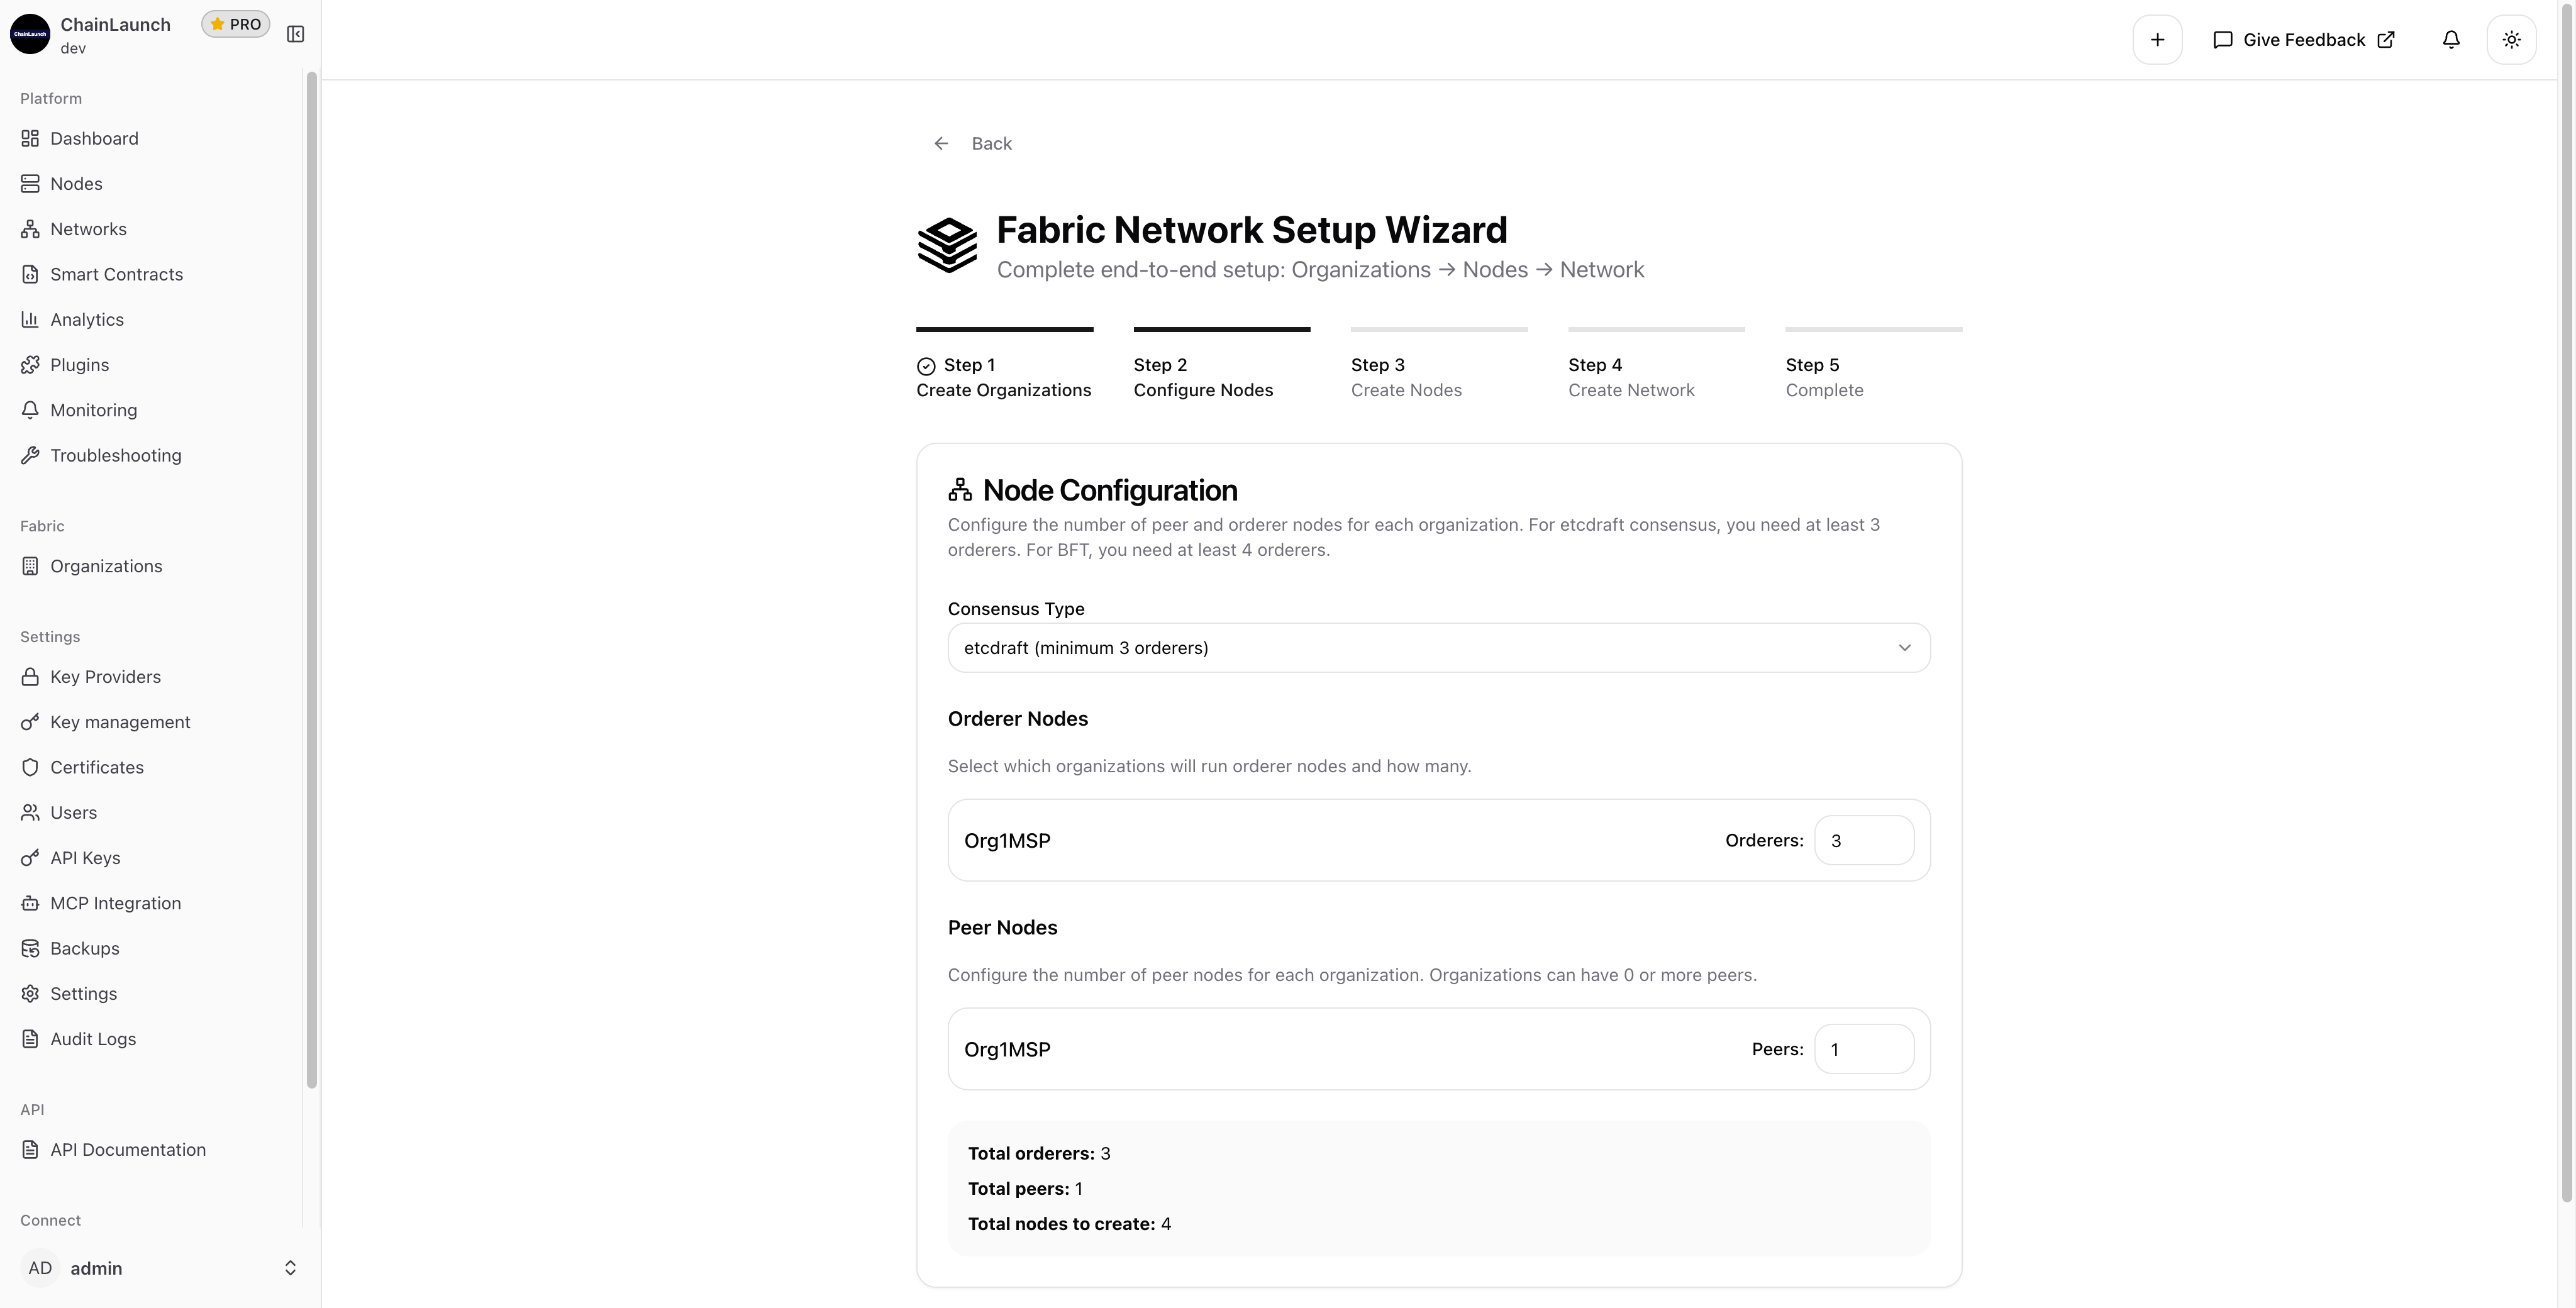
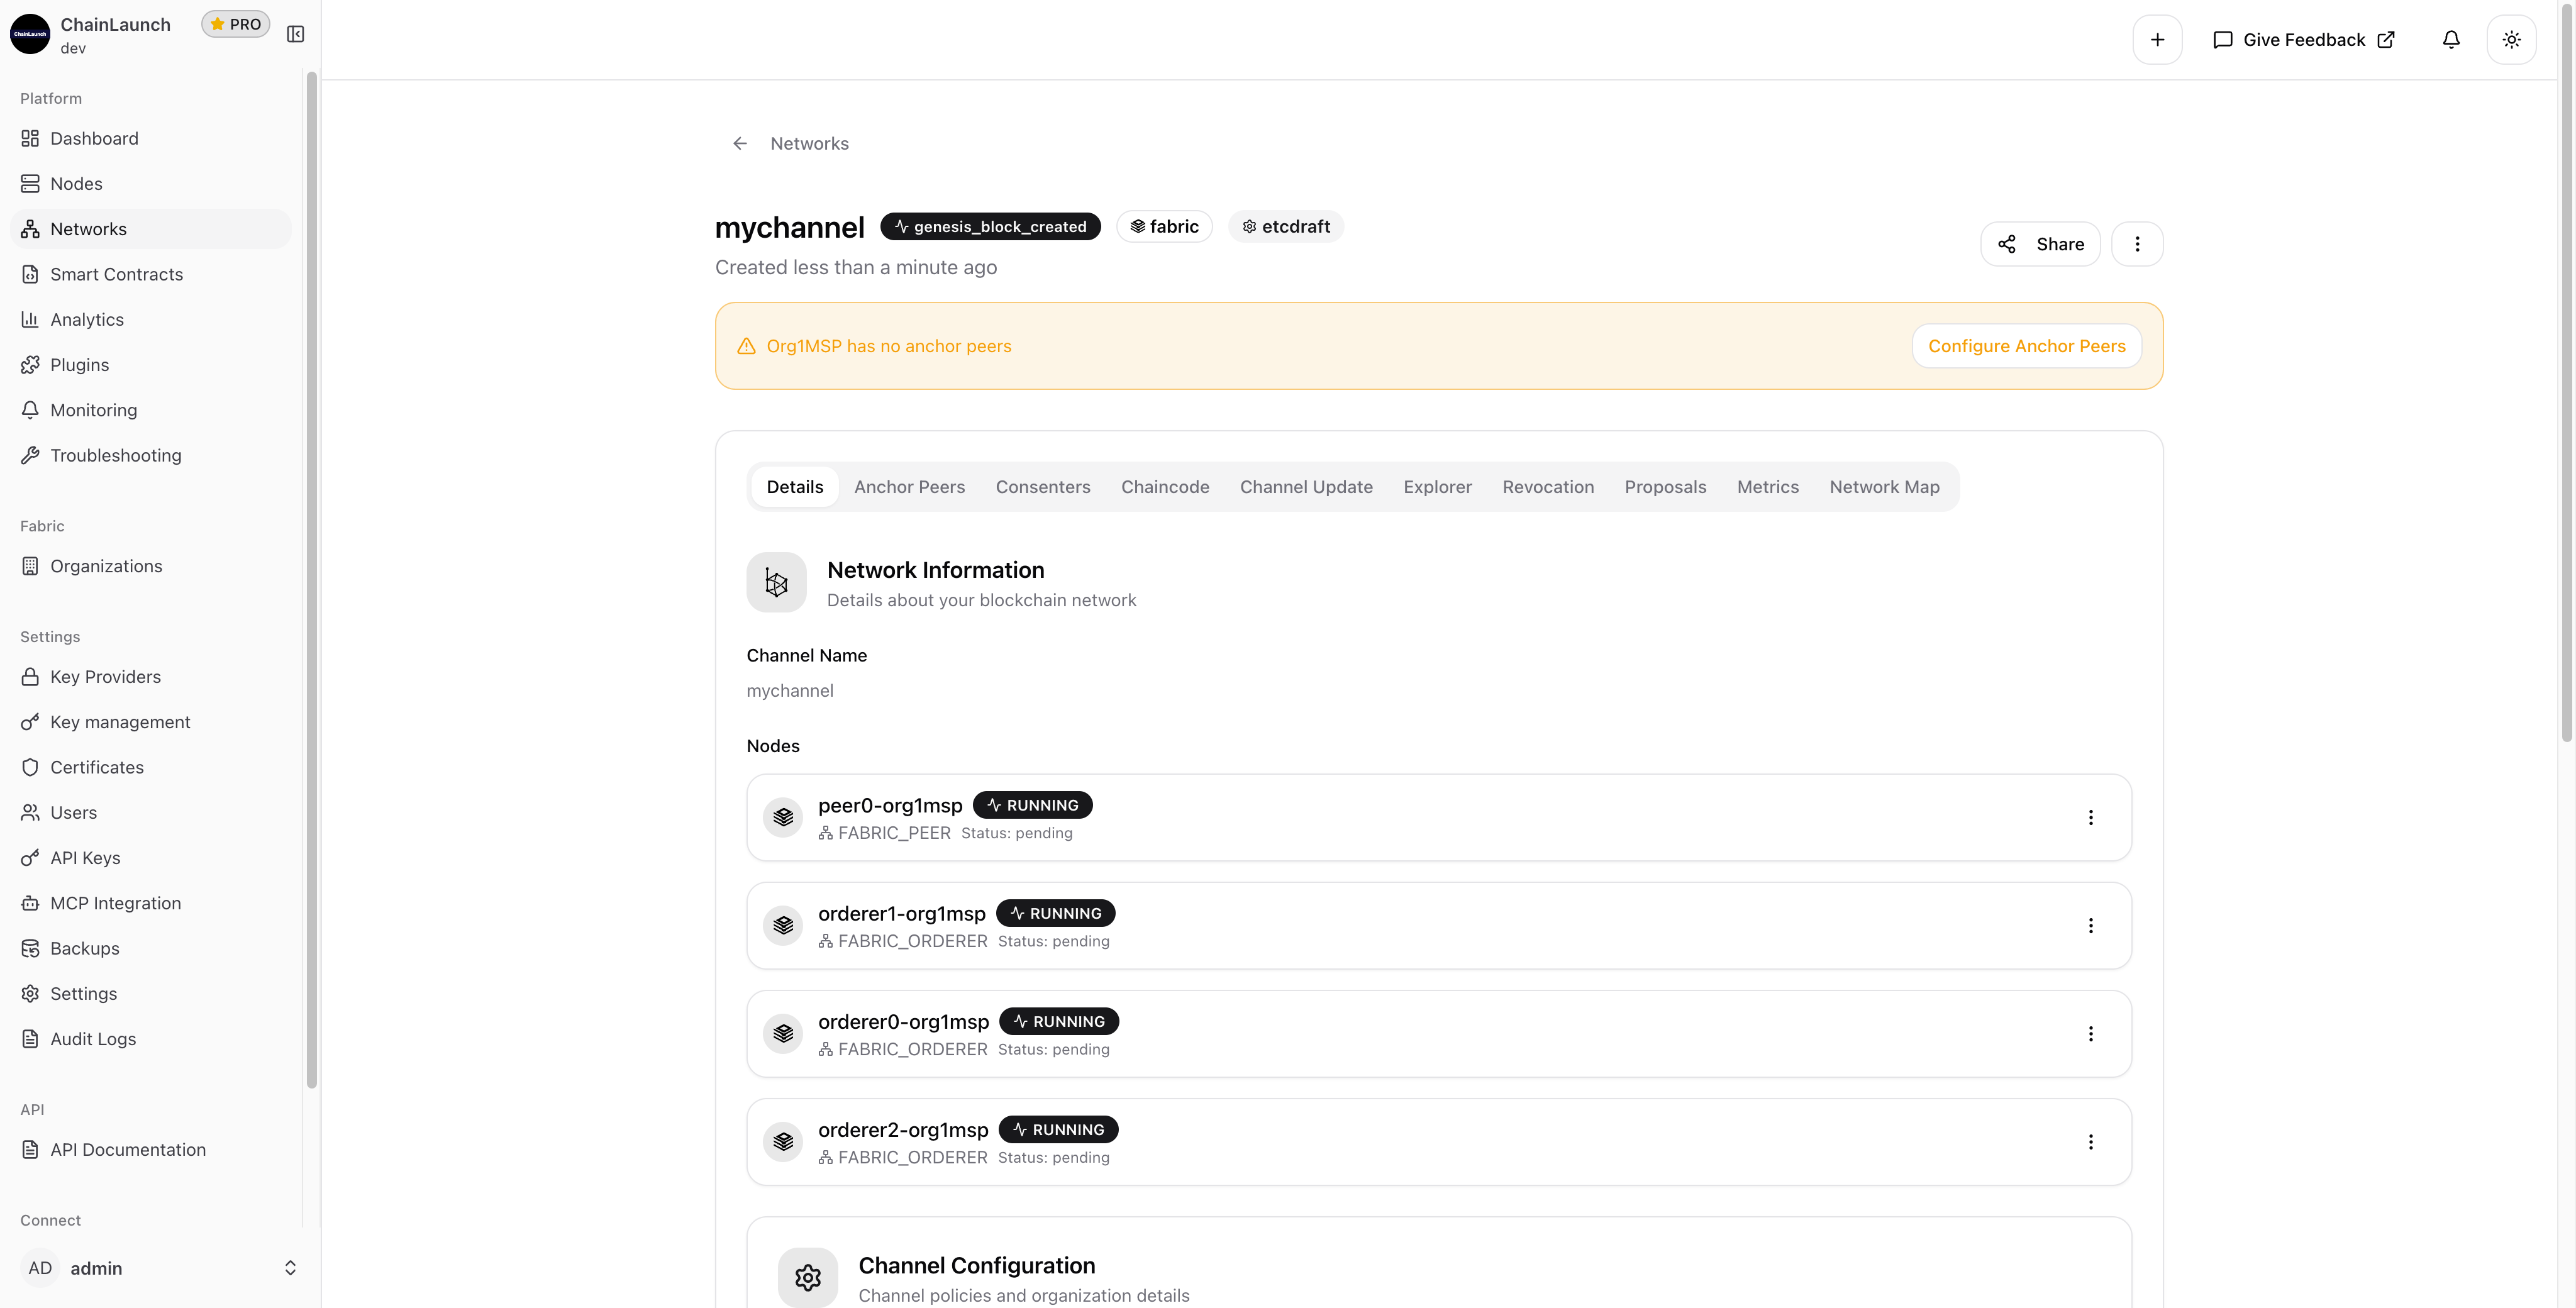
For etcdraft consensus, you need a minimum of 3 orderer nodes to tolerate 1 failure (the formula is 2f+1, where f is the number of tolerated failures). Production environments with stricter uptime requirements often run 5 orderers to tolerate 2 failures. BFT consensus requires a minimum of 4 orderers.

Can I add organizations to the network after creation?

Yes. Fabric supports dynamic consortium changes through channel configuration updates. You can add new organizations, their peers, and orderers to an existing channel without taking the network down. The process involves submitting a channel update proposal that existing members approve.

What's the difference between etcdraft and BFT consensus?

Etcdraft is a crash fault tolerant (CFT) protocol — it handles node crashes but not malicious behavior. BFT (Byzantine Fault Tolerance) can withstand nodes acting maliciously, but requires more orderers (minimum 4) and has slightly higher latency. Most private enterprise networks use etcdraft because participants are known and trusted.

Want to speed up your workflow even more? Learn how to deploy Hyperledger Fabric in under 5 minutes using the CLI.

Conclusion

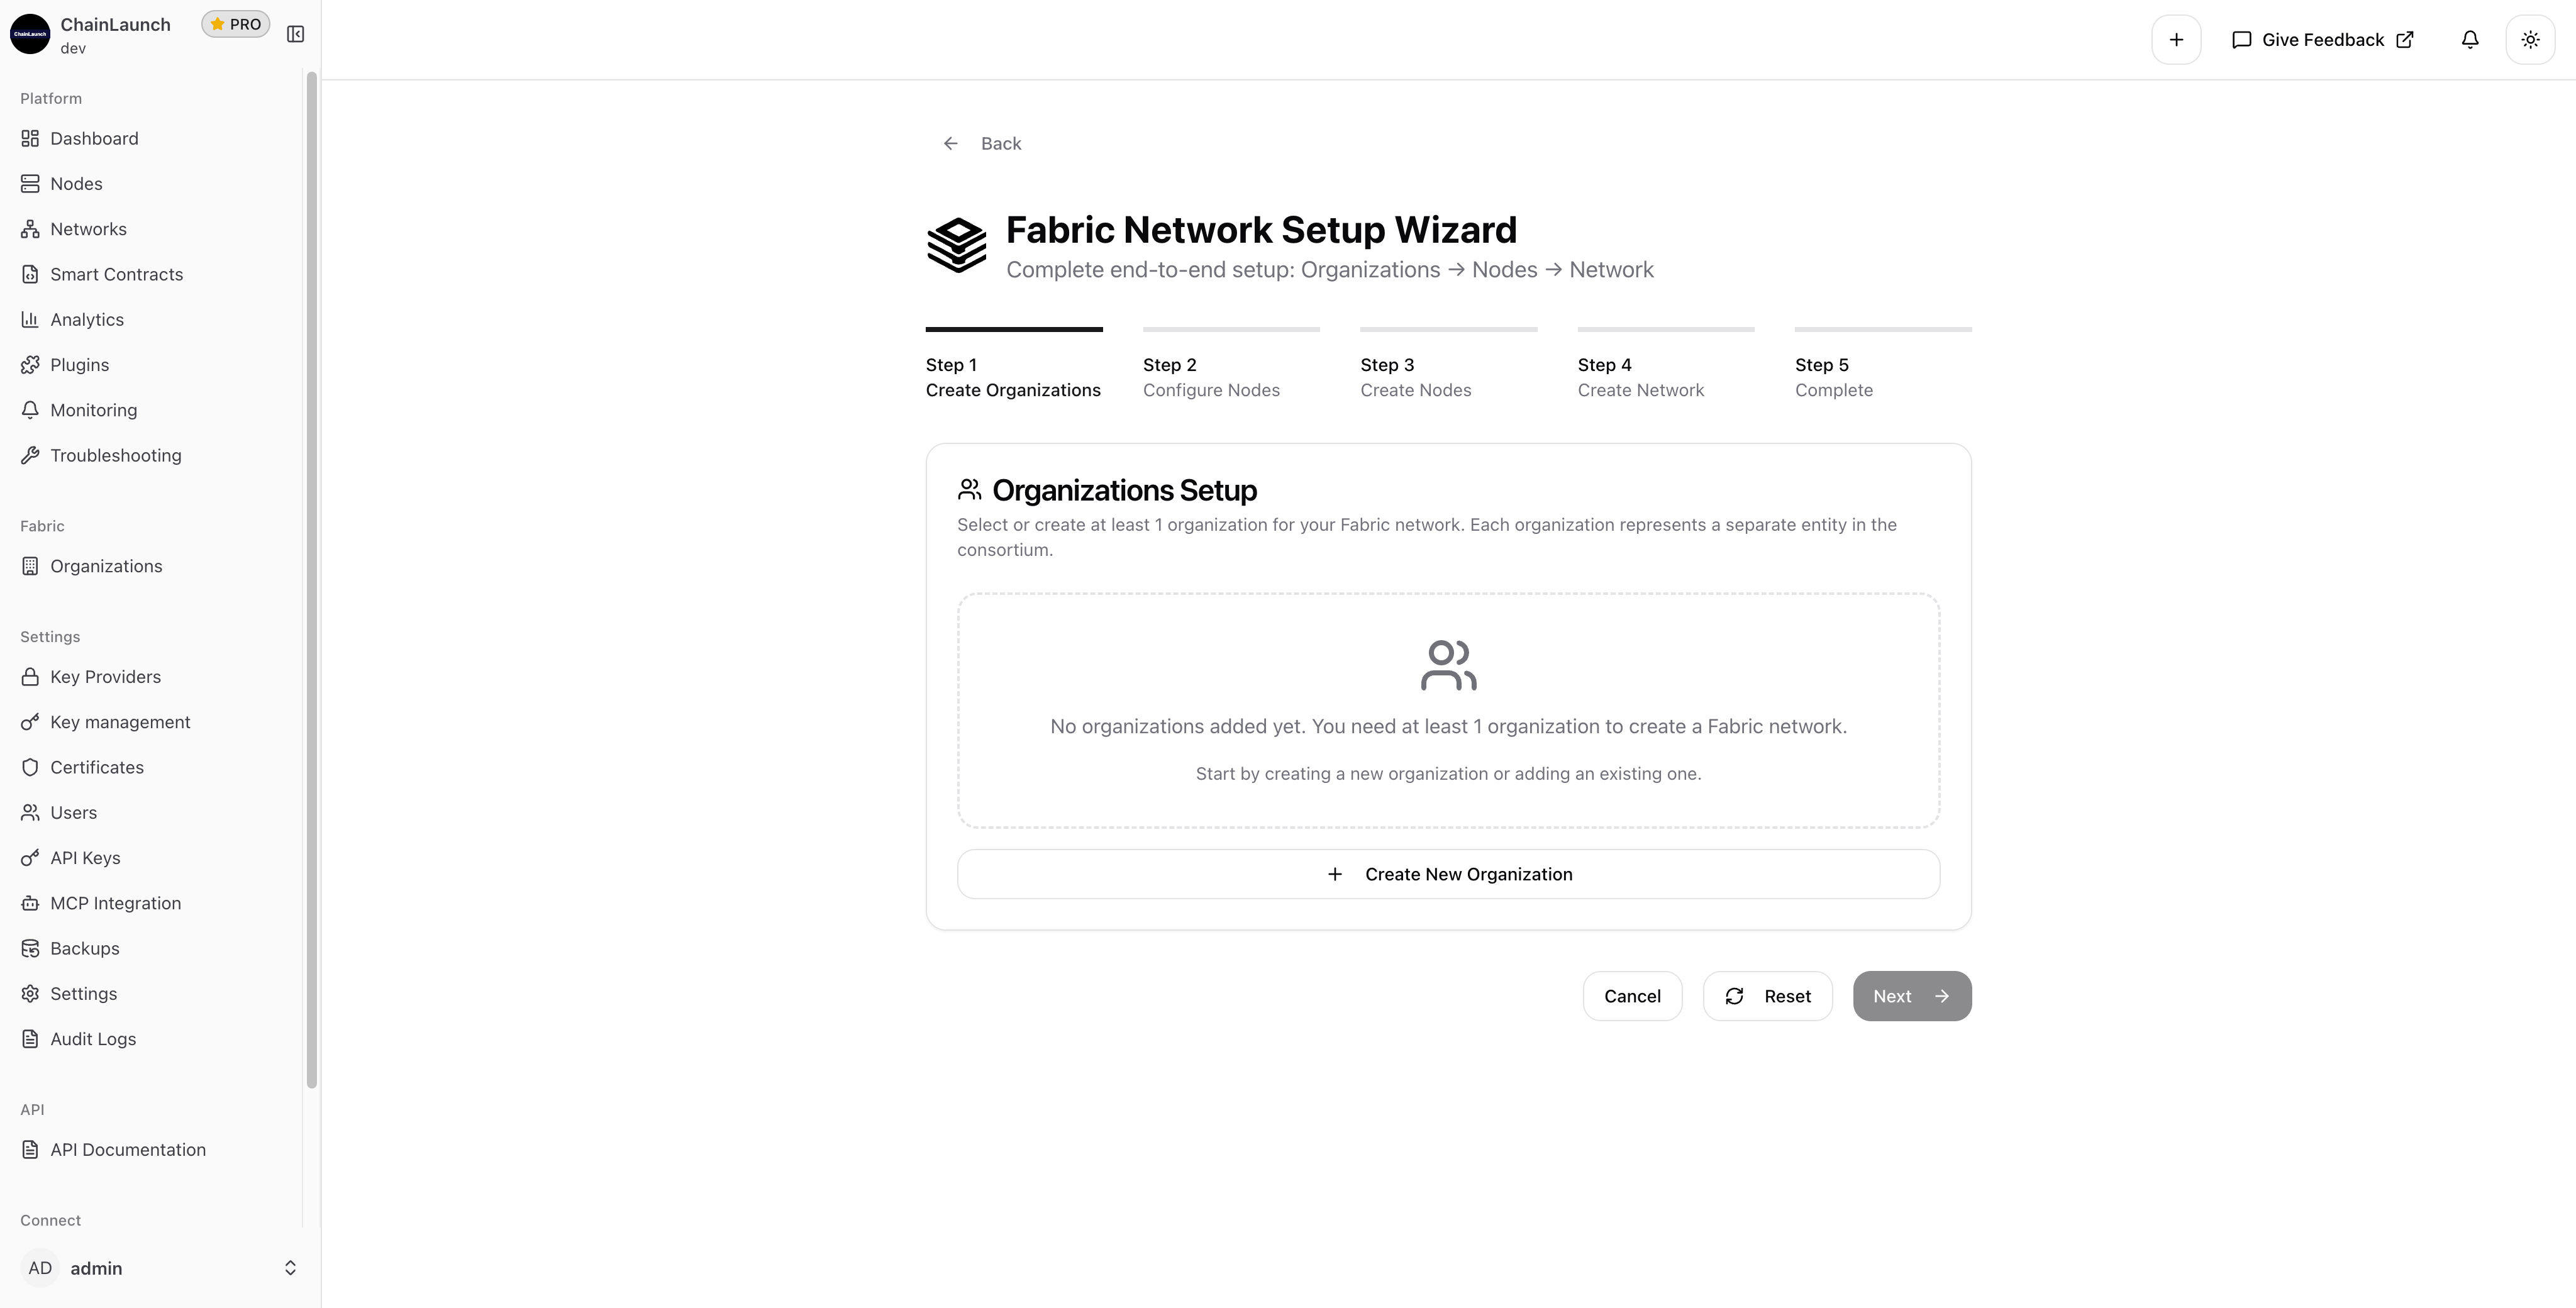
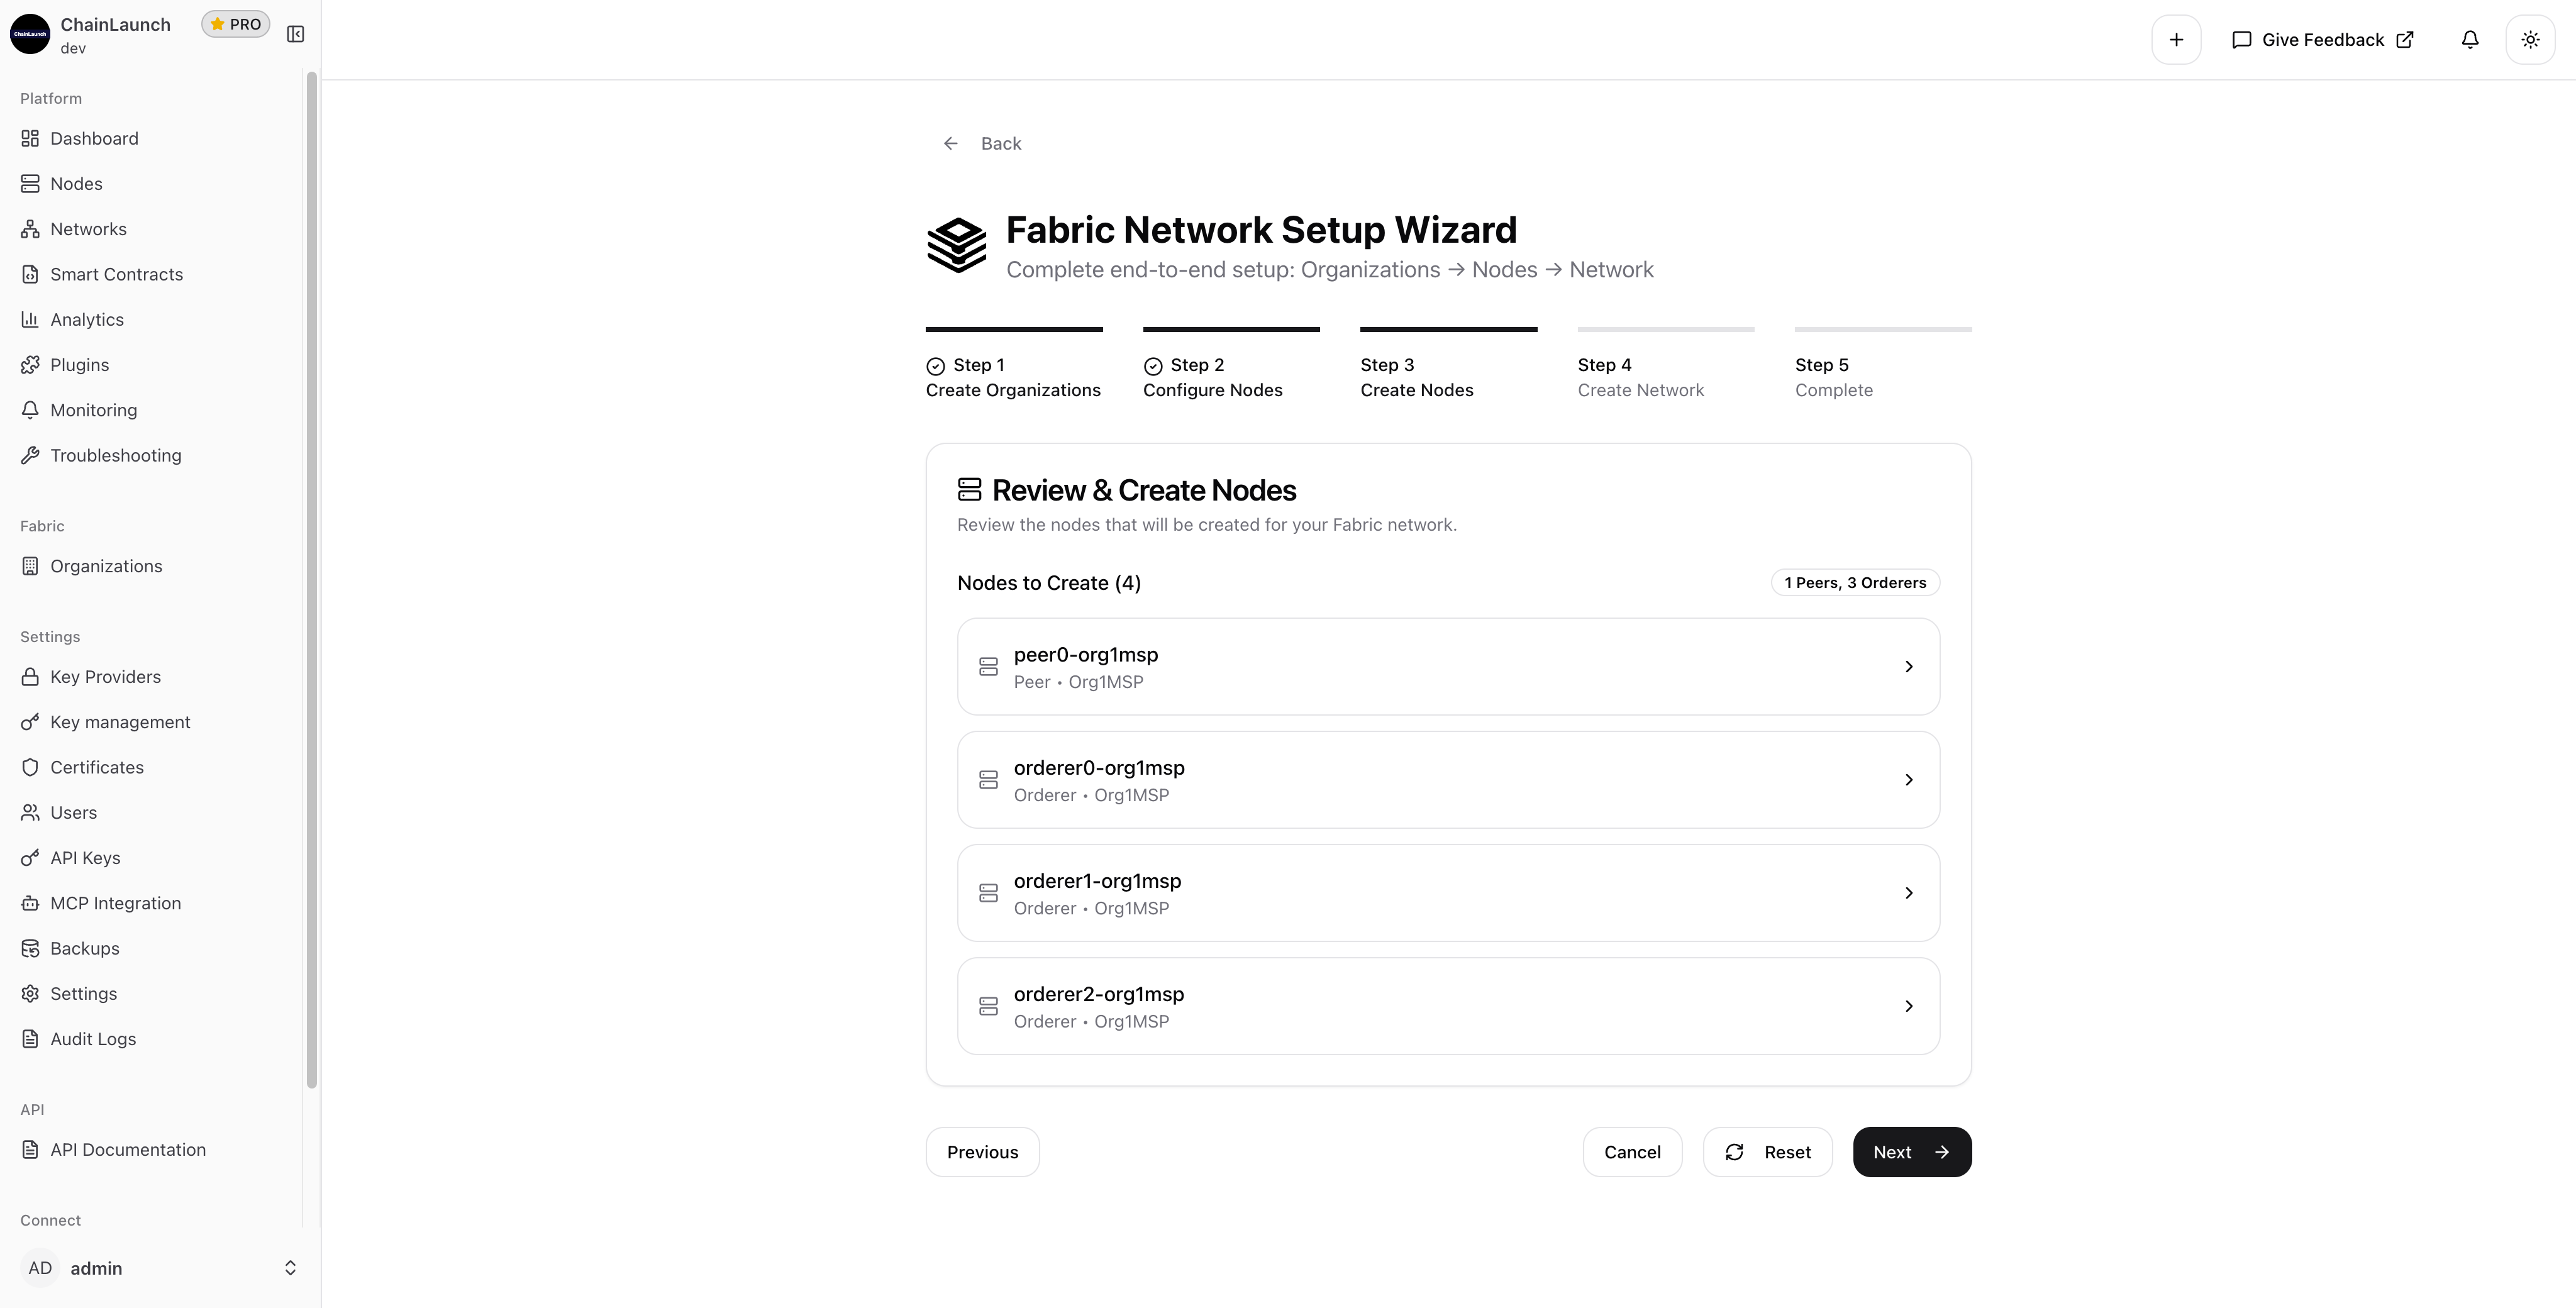
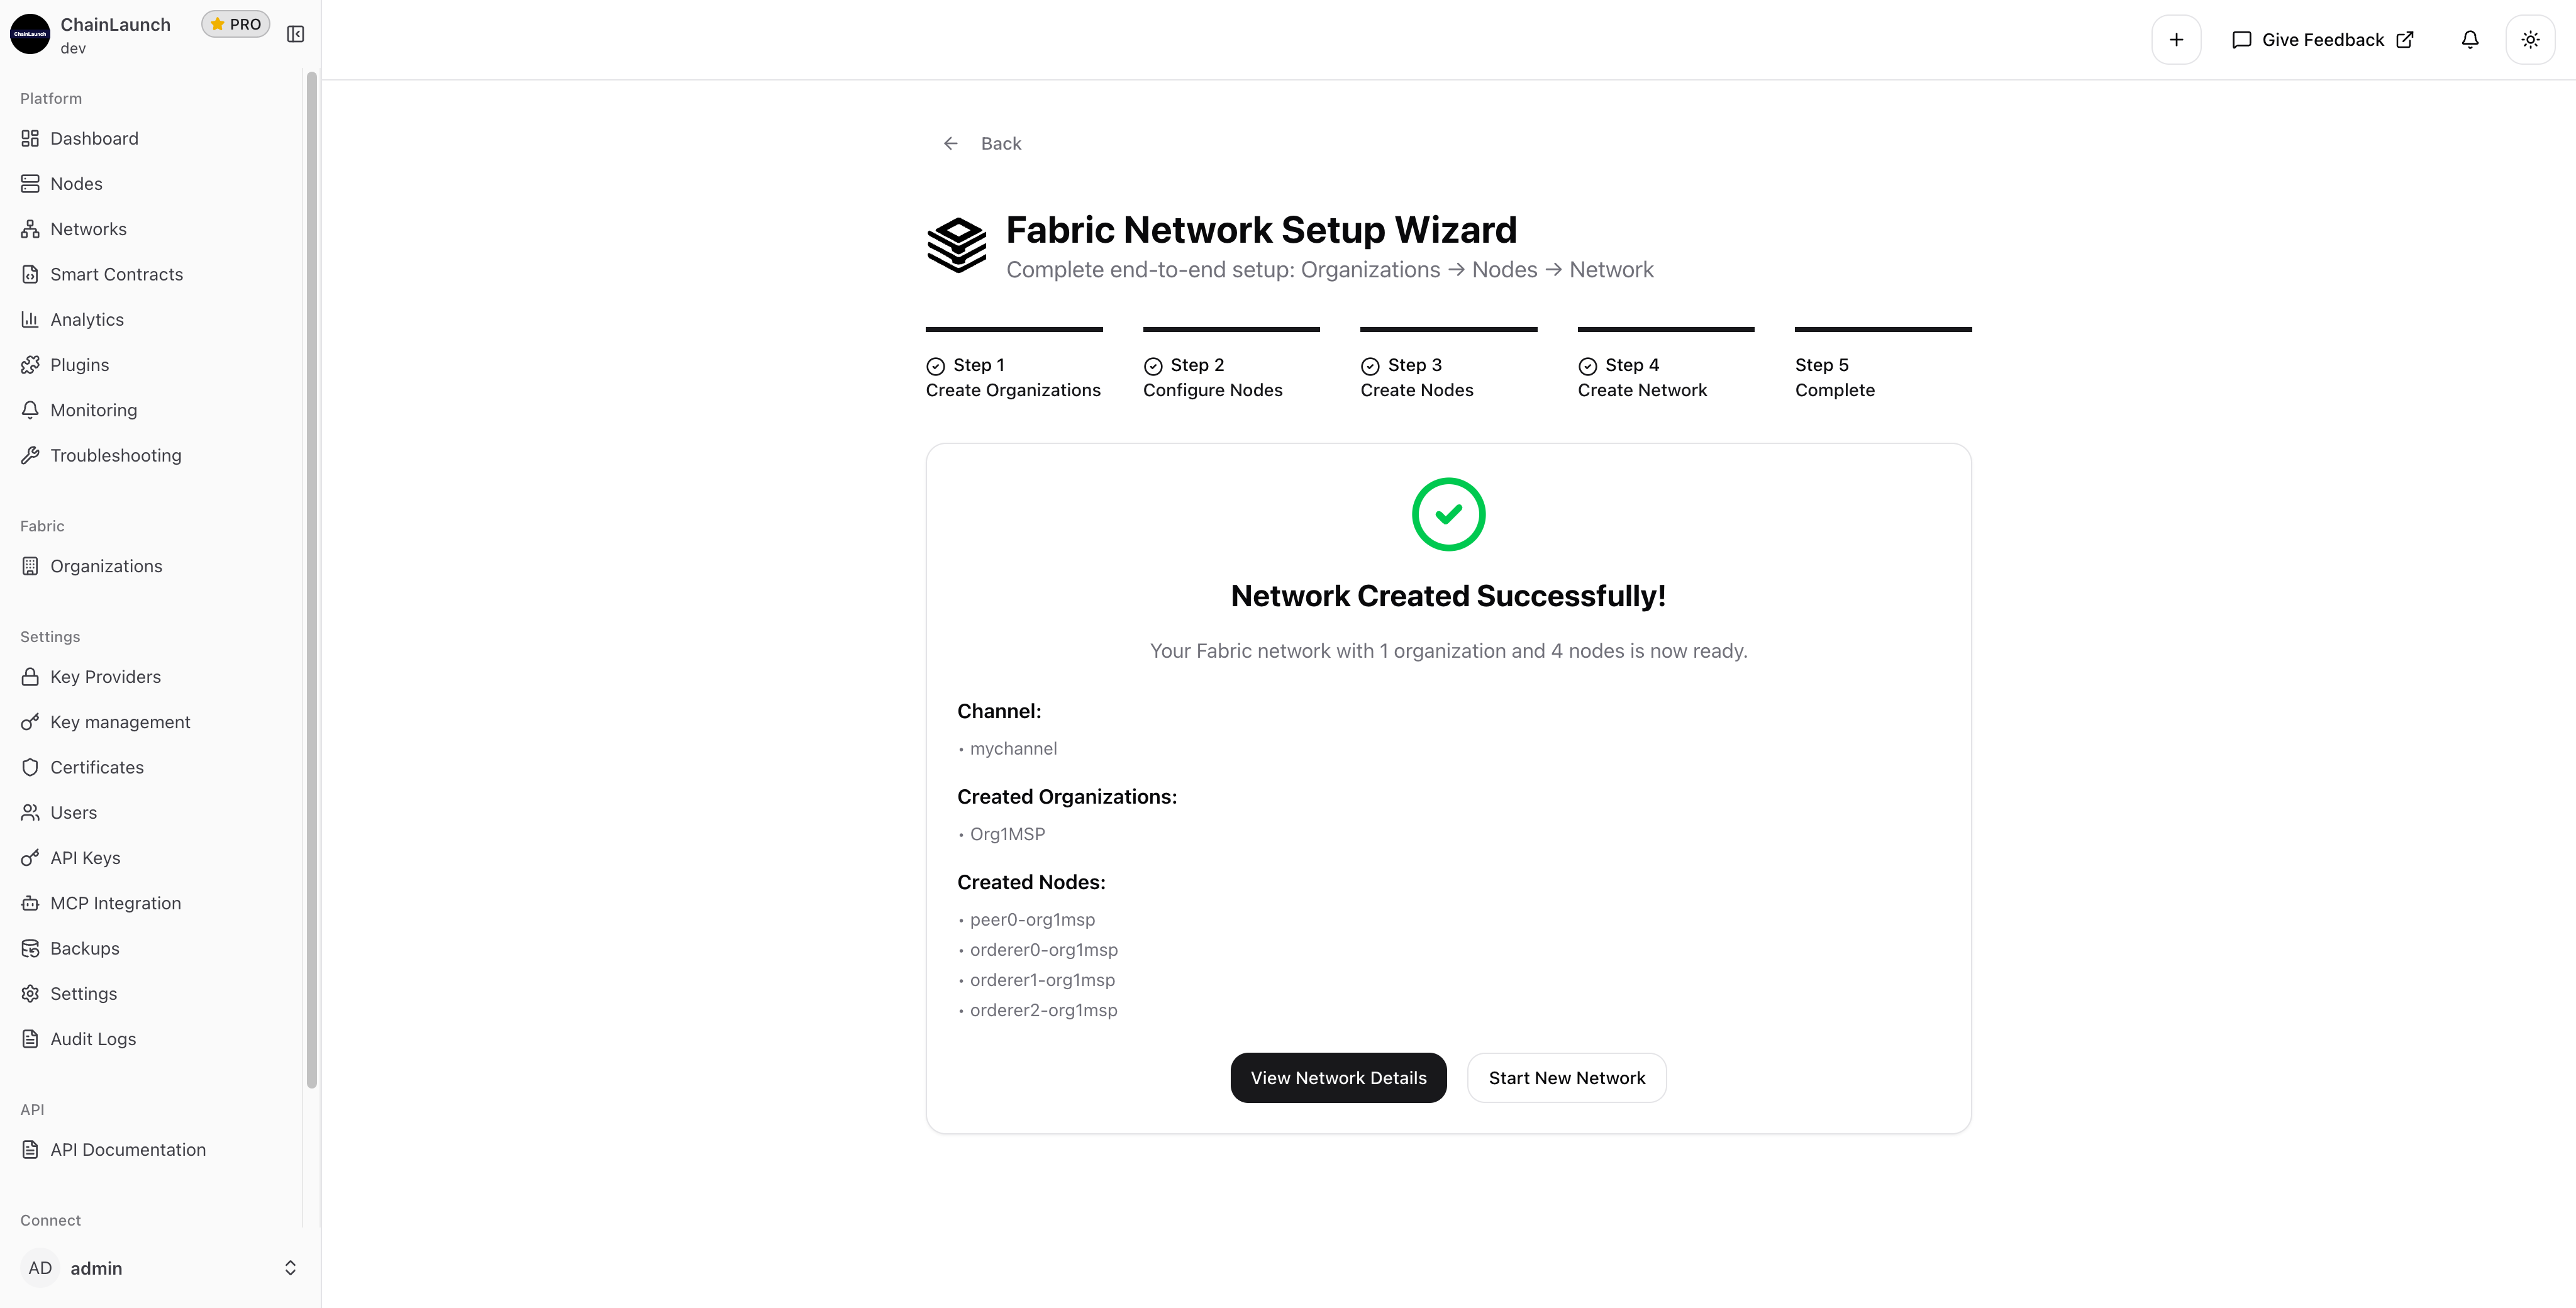
What traditionally required extensive Fabric knowledge and manual configuration now takes just minutes. The wizard handles all the complexity:

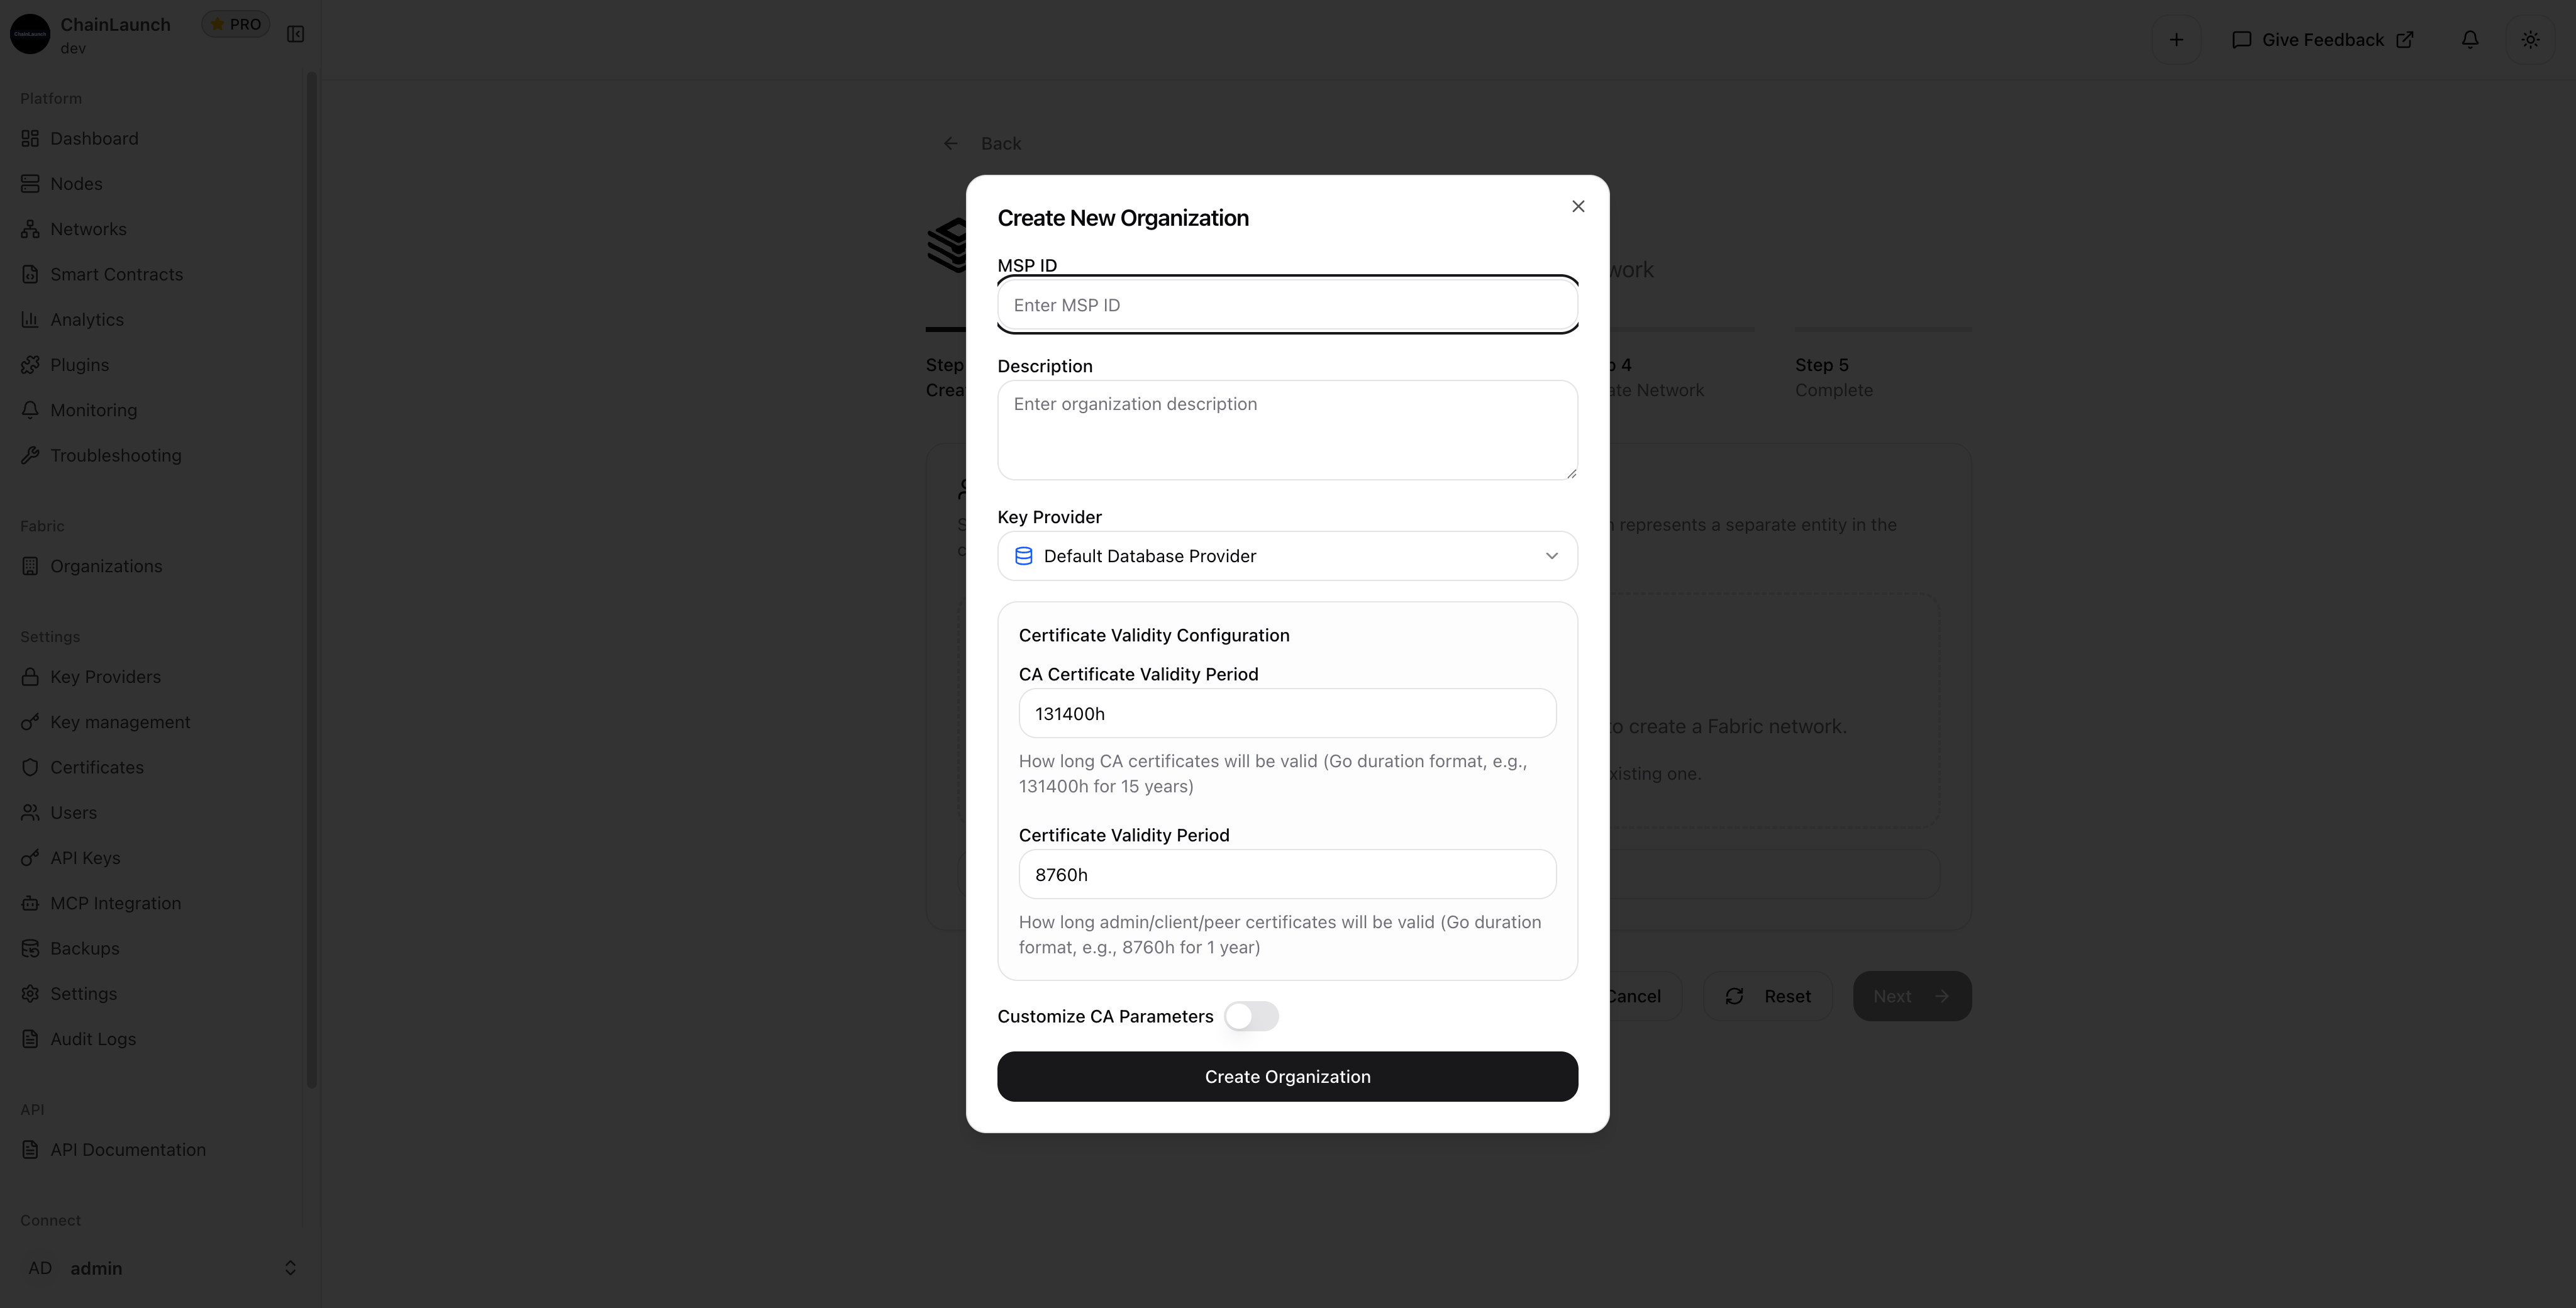
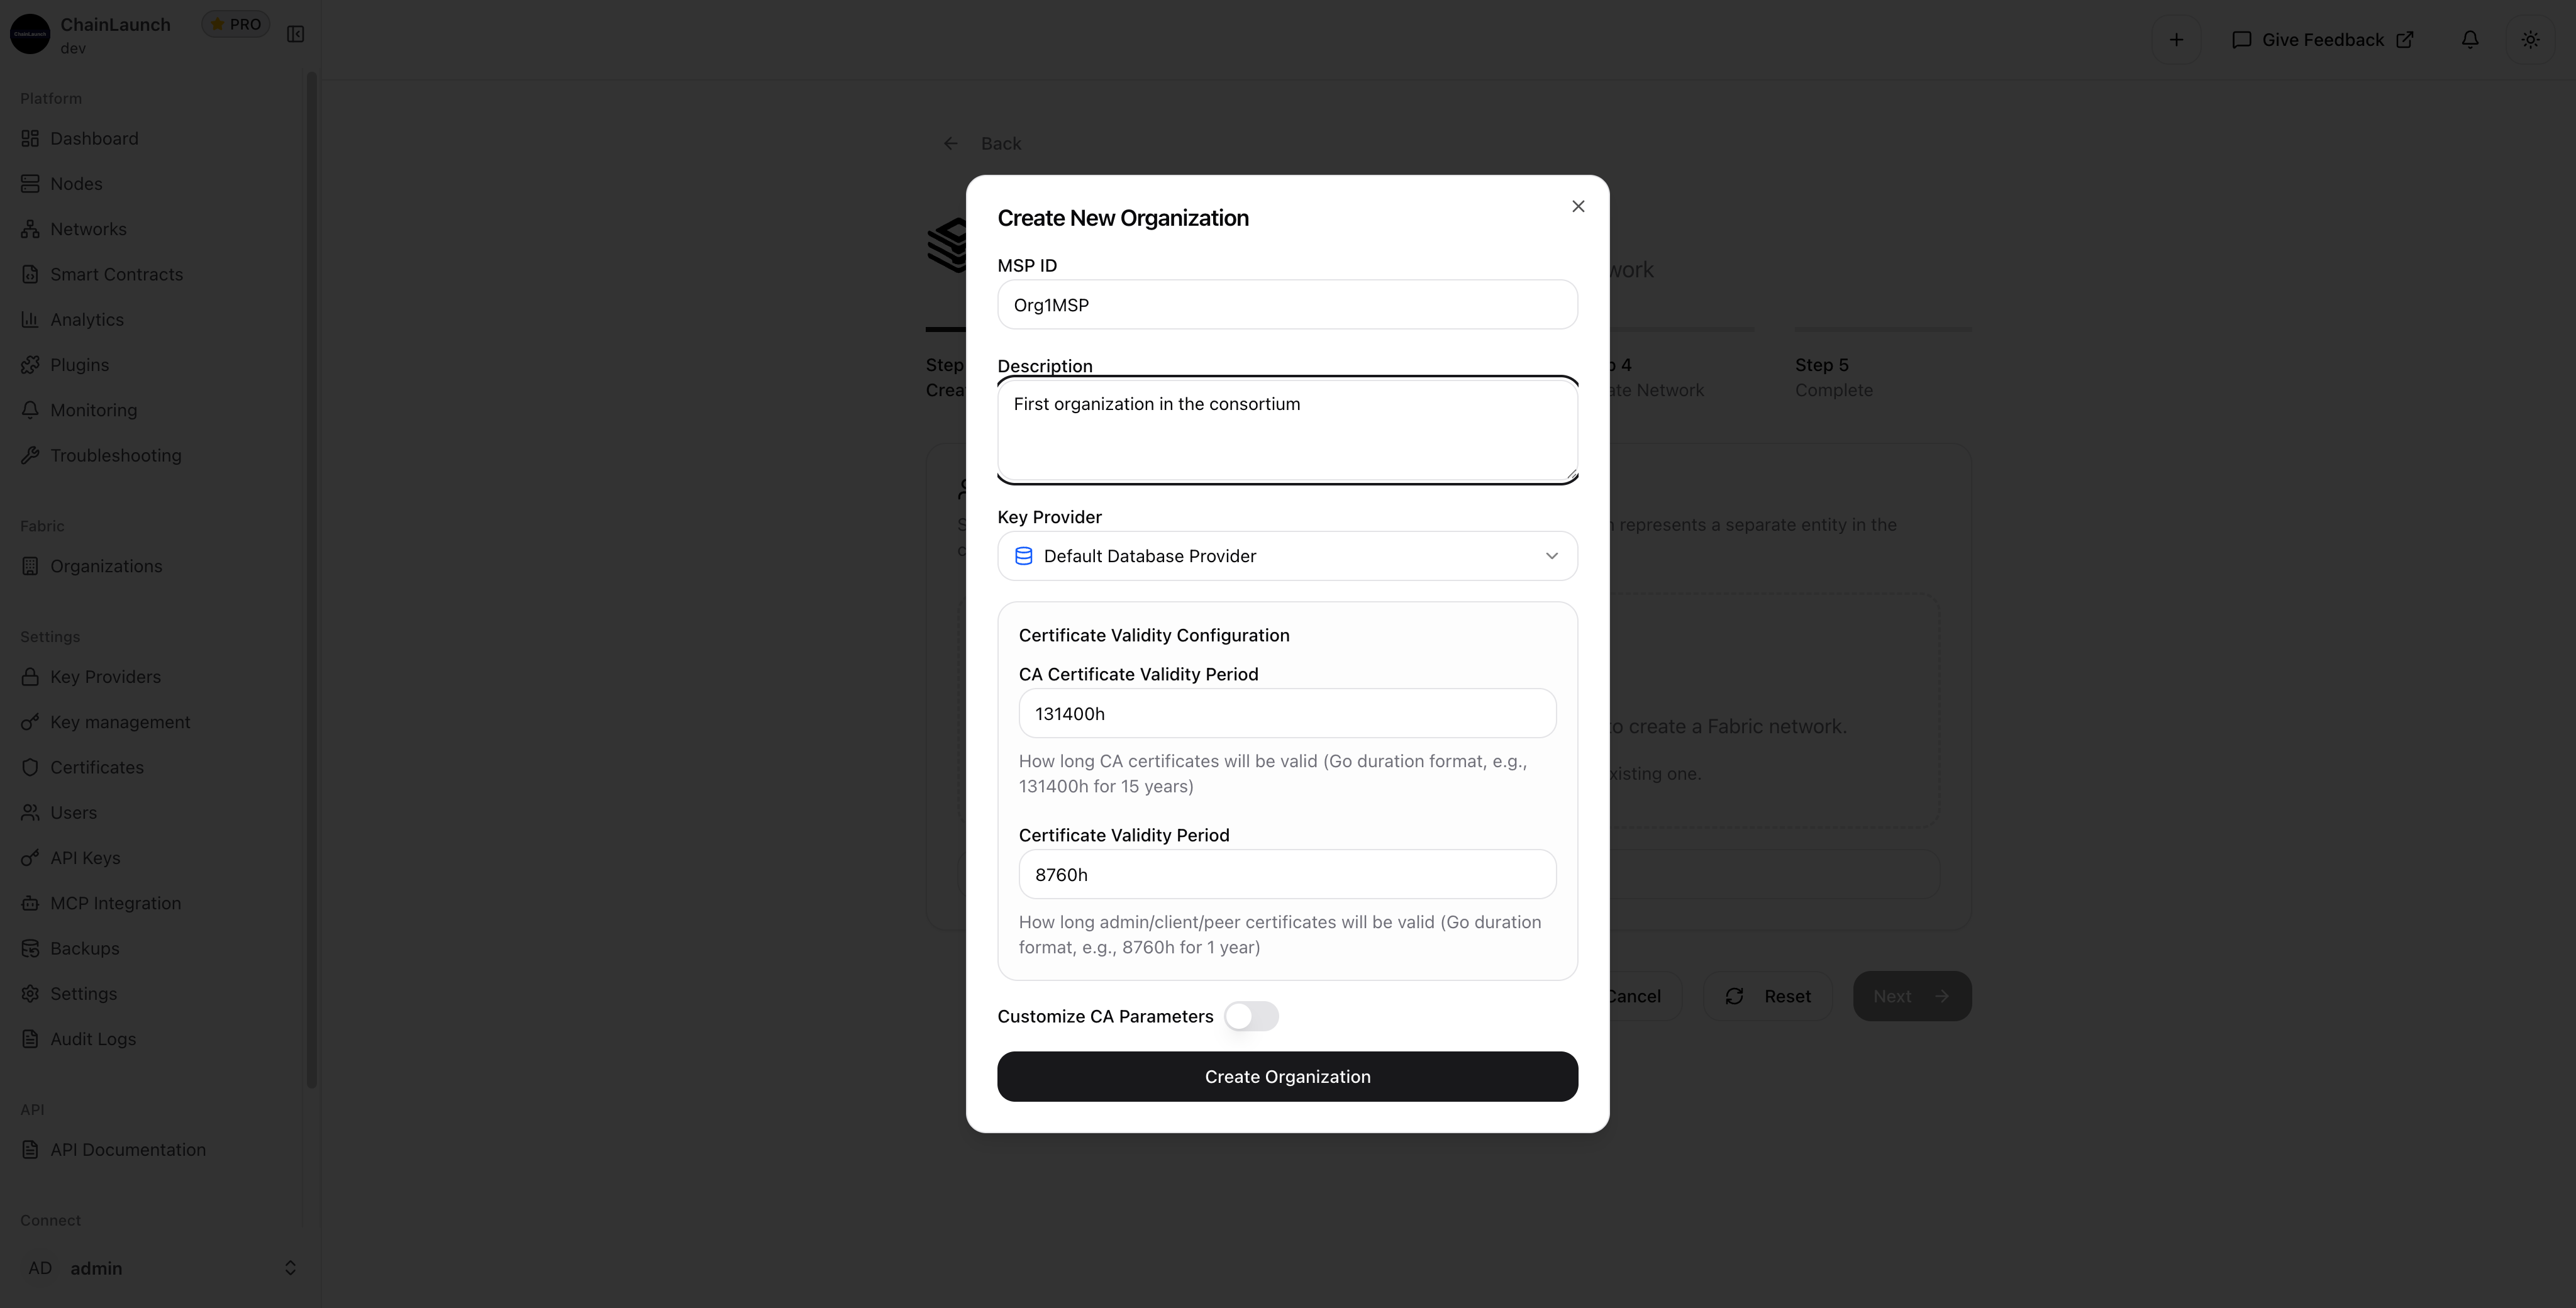
  • Organization and MSP setup
  • Certificate generation and management
  • Genesis block creation
  • Node deployment and configuration
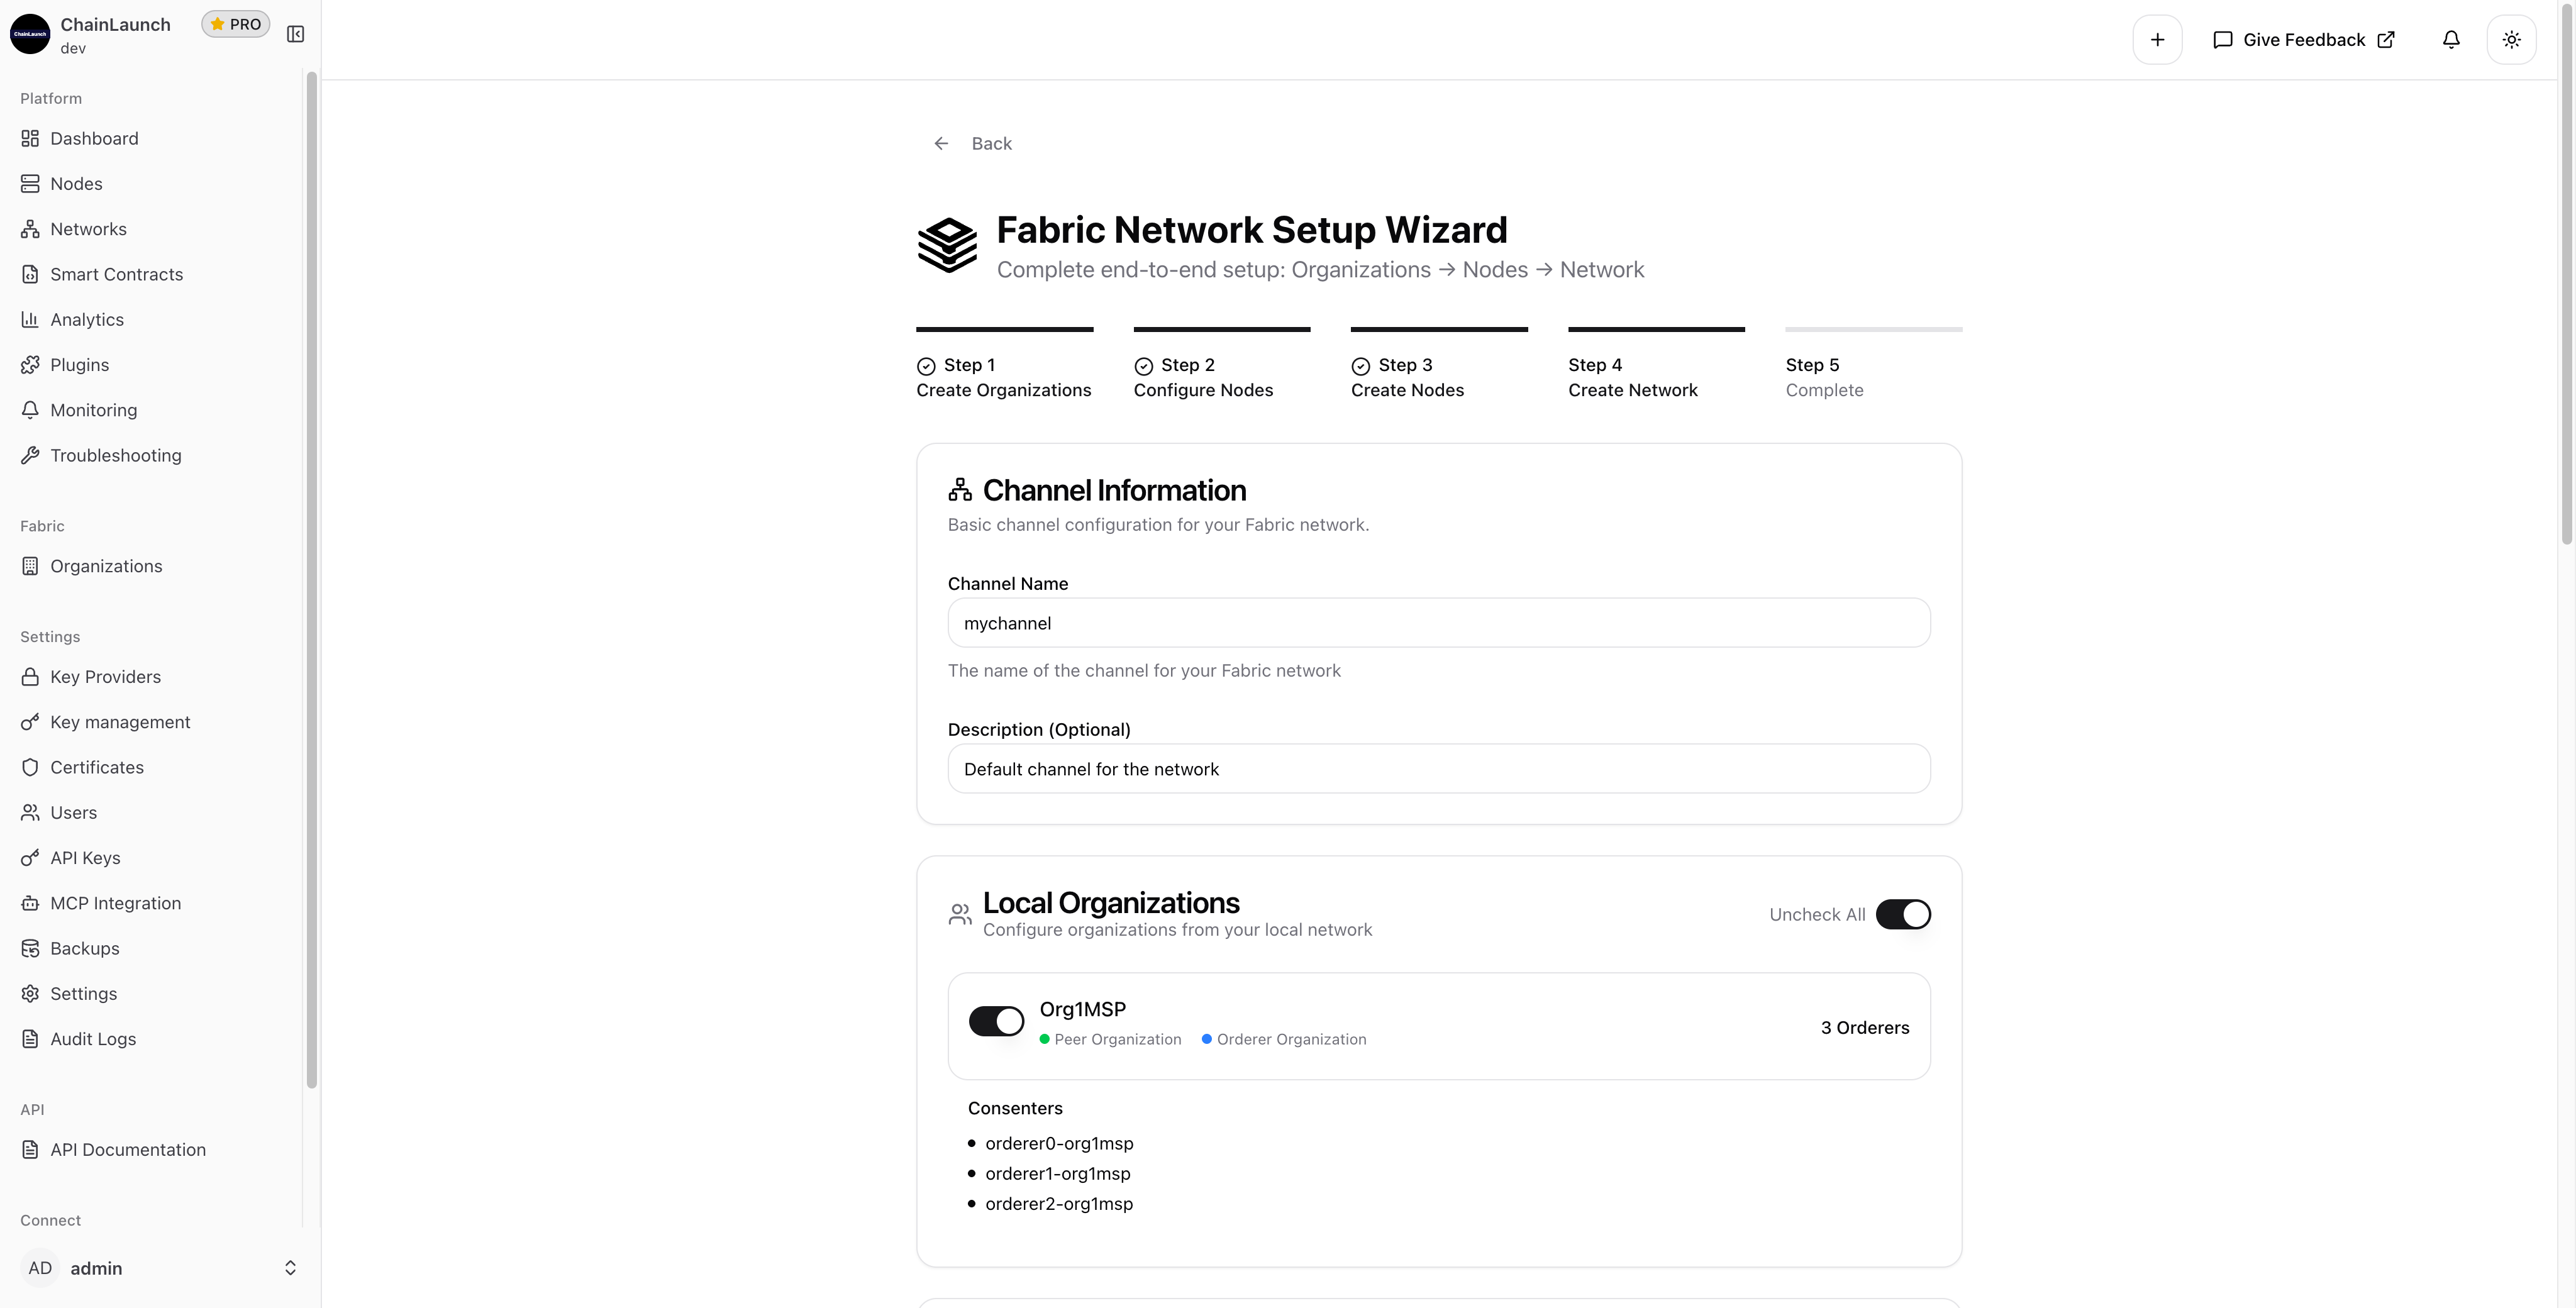
  • Channel creation and peer joining

The biggest time sink in Fabric deployments isn't the deployment itself — it's debugging misconfigured cryptographic materials. Automating certificate generation eliminates the single largest source of setup failures.

Ready to deploy your own Fabric network? Get started with ChainLaunch today.

Related guides: How Much Does Hyperledger Development Cost? | Kaleido vs ChainLaunch vs Kubernetes | AI-Powered Chaincode Development | Deploy a Besu Network in 2 Minutes


Need help? Check out our documentation or reach out to our support team.

Related Articles

Ready to Transform Your Blockchain Workflow?

Deploy Fabric & Besu in minutes, not weeks. AI-powered chaincode, real-time monitoring, and enterprise security with Vault.

ChainLaunch Pro: $60,000/year   Includes premium support, unlimited networks, advanced AI tools, and priority updates.

Questions? Contact us at support@chainlaunch.dev

How to Create a Hyperledger Fabric Network | ChainLaunch